There is a very fine line between a beautifully curated shelf and a shelf that looks like a yard sale display. I crossed that line more times than I want to admit before I figured out the formula. The difference is not about having expensive things — it is about how you arrange them, how much space you leave between them, and knowing when to stop adding.
My favorite shelves in my house are styled almost entirely with thrifted and vintage pieces — a brass candlestick from an estate sale, a ceramic vase from Goodwill, a small painting I found at a flea market, and books I have collected over years. Together, they tell a story. Separately, they cost me maybe twenty dollars total. This is the skill that makes your home look like it was decorated by someone with incredible taste and unlimited budget, when really you just know how to arrange things.
Why I Keep Coming Back to This
- Shelves are the most-photographed surface in any home — styled shelves consistently get the most engagement on Pinterest and Instagram because they are visually dense and tell a story in a single frame
- Vintage pieces add instant character — mass-produced decor all looks the same. One vintage brass object or handmade ceramic vase adds personality that no retail item can replicate
- The collected home look defines 2026 — rooms that feel gathered over time rather than purchased in one shopping trip are the most-wanted aesthetic this year. Shelves are the easiest place to achieve this
- Almost free to style — between thrift stores, estate sales, and shopping your own home, you can style entire shelving units for under twenty dollars. The key is arrangement, not expenditure
- Easy to change seasonally — swap a few items, add fresh branches, change the art print. Shelf styling is the most flexible form of decorating because nothing is permanent or heavy
- Showcases your personality — travel souvenirs, inherited objects, favorite books, handmade ceramics. Your shelves should reflect your life, not a catalog. That is what makes them interesting
What You’ll Need
Build your shelf styling collection from these categories:
- Books: A mix of coffee table books, vintage hardcovers with attractive spines, and small paperbacks. Stack both vertically and horizontally
- Ceramics: Vases, bowls, small pots in varying shapes and sizes. Thrift stores are goldmines for these
- Organic elements: A small plant, dried stems, a branch, a piece of driftwood, or a shell collection
- Brass and metal: Candlesticks, small trays, bookends, or decorative objects in brass, copper, or iron
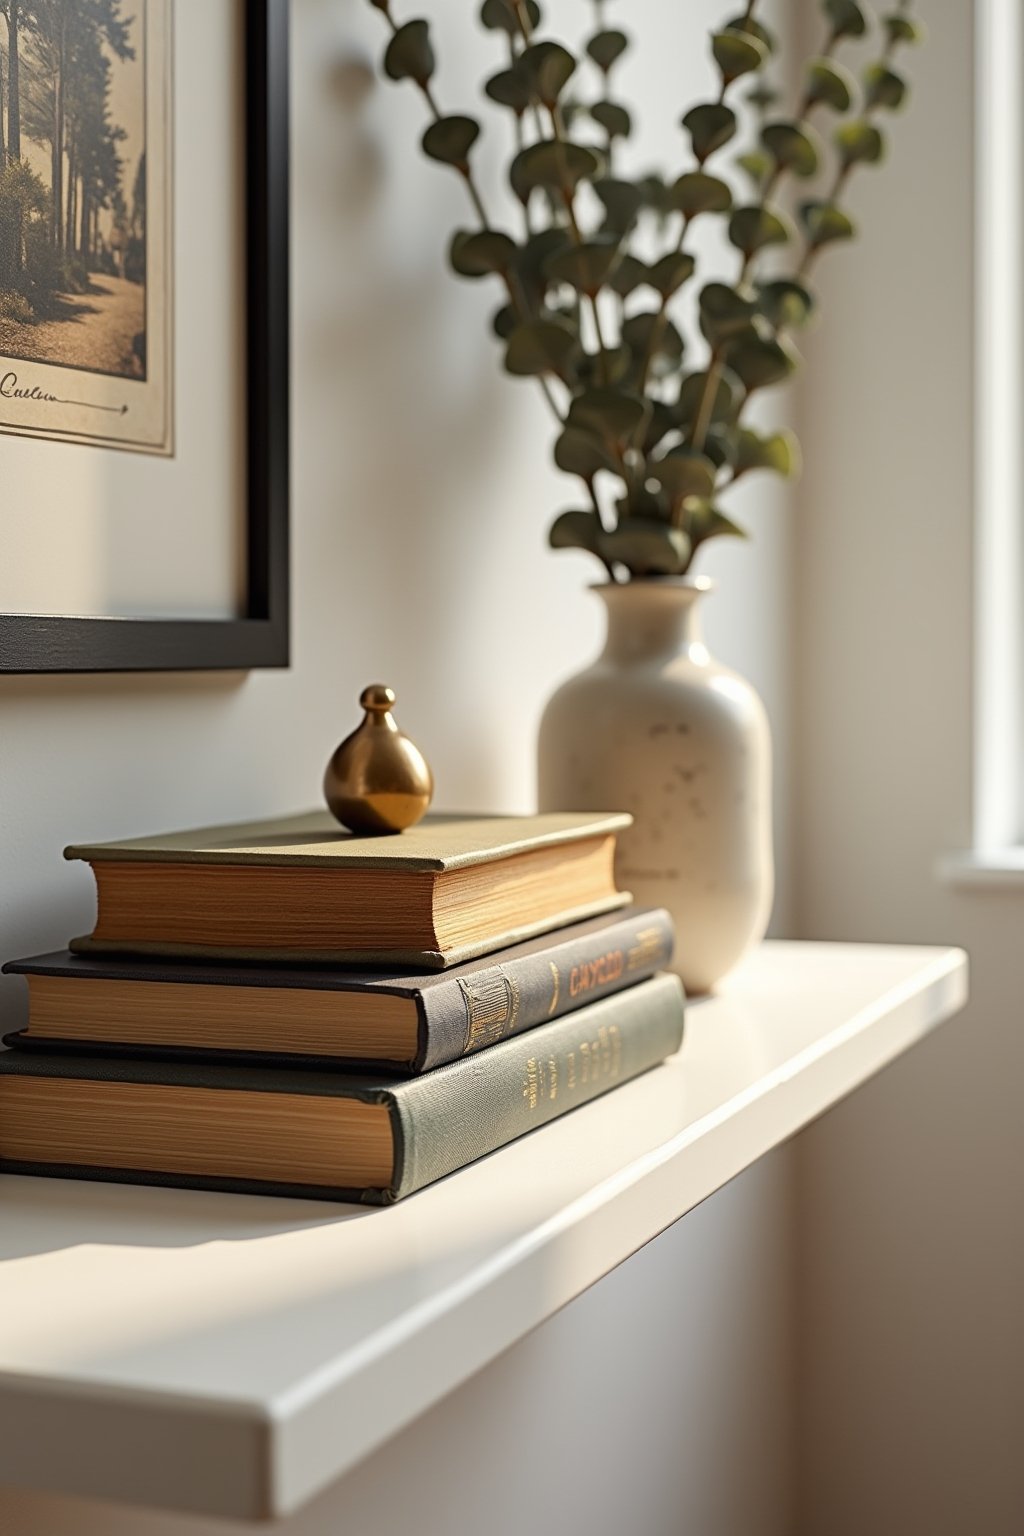
- Art and frames: Small prints, postcards in frames, or a tiny original painting leaned against the back of the shelf
- Personal objects: Travel souvenirs, inherited items, handmade pieces — anything with a story
From Start to Finish
Start by Emptying and Cleaning the Shelf
Take everything off the shelf and clean the surface. Starting with a blank canvas is essential — you cannot see the potential of an arrangement when you are trying to rearrange around existing clutter. Wipe down each shelf and let the empty space remind you that less is always more.
While everything is off, group your objects on the floor by type — books in one pile, ceramics in another, plants together, art together. This lets you see your full inventory and make intentional choices about what goes back, rather than reflexively putting everything where it was before.
Place Your Anchor Pieces First
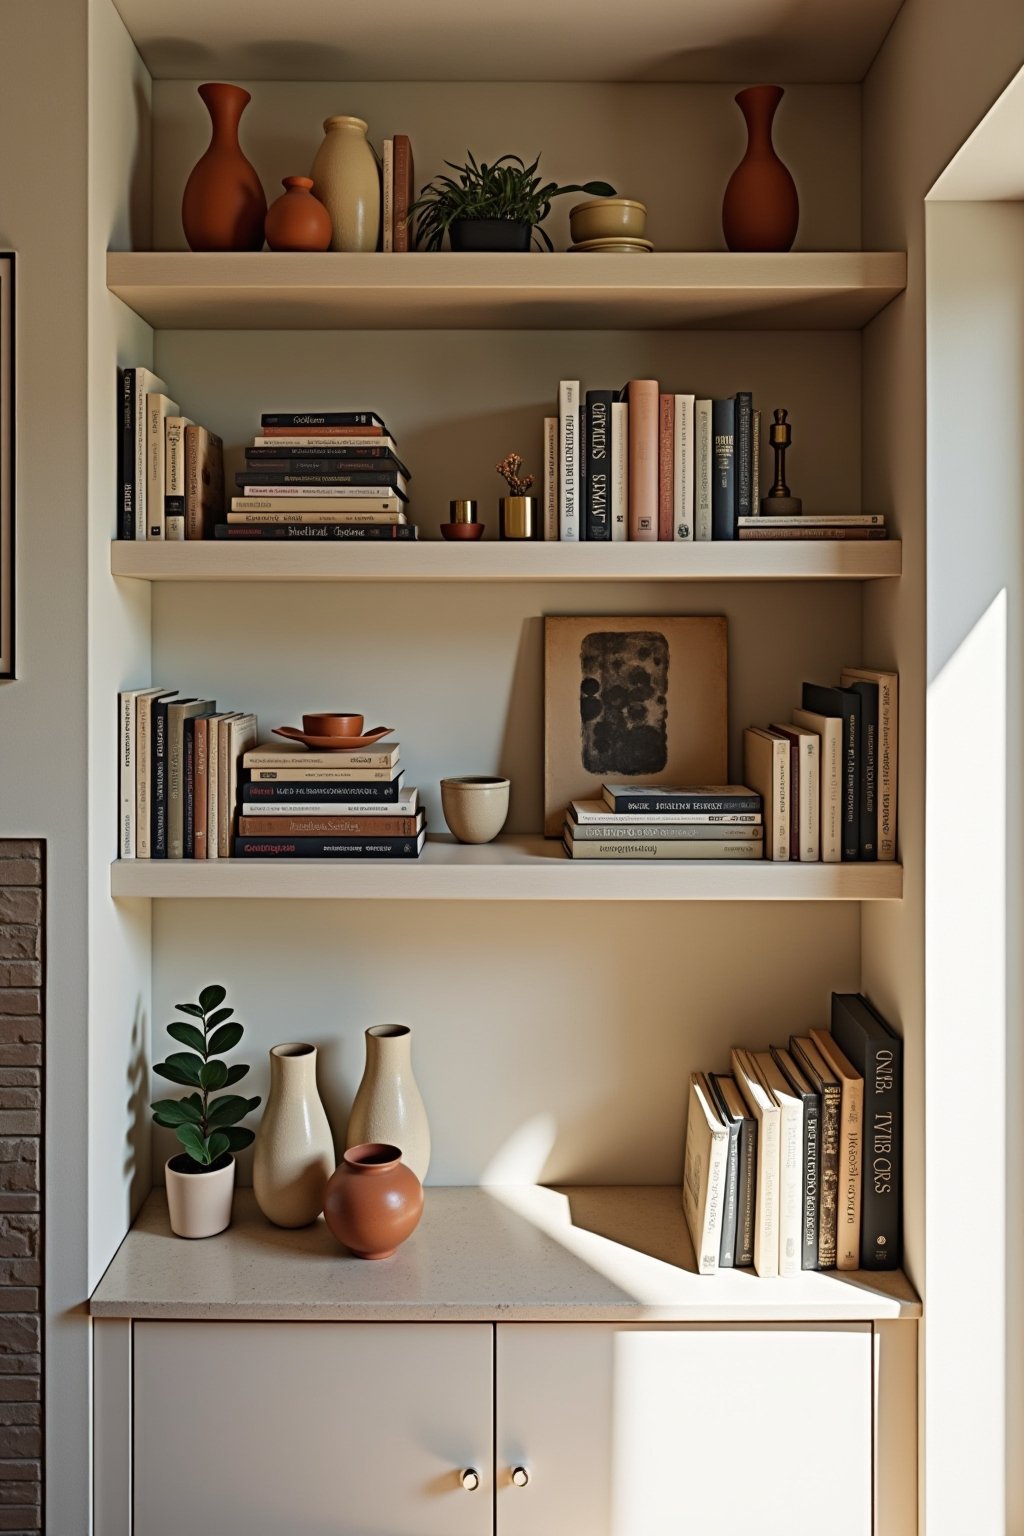
Start with the largest pieces — tall vases, stacked books, or a piece of framed art leaned against the back. These anchor objects define the visual weight distribution across the shelves. Place them first and space them so they are not all on one side or one shelf.
A good rule: alternate which side of the shelf gets the tall anchor. If the top shelf has its tallest piece on the left, the next shelf should have its tallest piece on the right. This creates a zigzag pattern of visual weight that makes the eye travel naturally across the whole unit.
Layer in Medium and Small Objects
With your anchors placed, fill in with medium-sized objects — smaller vases, a ceramic bowl, a candle, a small plant. These should cluster near the anchors in groups of two or three, creating mini vignettes on each shelf rather than a single line of evenly spaced items.
The secret to making thrifted pieces look expensive is grouping by material or color. Three different brass objects clustered together — a candlestick, a small tray, and a decorative box — look like a deliberate collection. The same three pieces scattered randomly across the shelf look like clutter.
Add Organic and Personal Elements
Every styled shelf needs something alive or organic — a small potted plant, a cutting in a glass vase, dried eucalyptus, or fresh seasonal stems. Plants bring movement and life to an otherwise static display and soften the hard edges of books and ceramics.
Then add your personal touches — a small framed photo (not a standard family portrait, but an interesting travel photo or vintage print), a souvenir from a meaningful trip, or an object with a story. These personal pieces are what make your shelves uniquely yours rather than a copy of a magazine.
Edit Ruthlessly and Leave Empty Space
This is the hardest and most important step. Remove at least twenty percent of what you placed. The space between objects is what makes the arrangement look curated rather than crammed. Every piece should have room to breathe, and some shelf sections should be intentionally bare.
Take a photo with your phone and study it. Photos reveal problems your eye glosses over in person — too much visual weight on one side, one shelf that is much busier than the rest, or a color that does not belong. The final result should feel effortless, which paradoxically requires the most deliberate editing.
Backing Out of a Mistake
- Filling every inch — the number one shelf styling mistake. Empty space is not wasted space — it is what makes the objects you kept feel important and visible. Aim for thirty percent empty space minimum
- Using too many small items — ten tiny objects create visual noise. A few medium and large pieces with minimal small accents looks dramatically more polished
- Everything the same height — a row of objects all the same size reads as a lineup, not a display. Vary heights dramatically within each shelf grouping
- No books — books are the backbone of shelf styling. They add color, height (when stacked), and create platforms for smaller objects. Do not skip them even on decorative shelves
- All store-bought, no character — a shelf of matching items from the same retailer looks like a store display. Mix one or two thrifted or vintage pieces into every shelf for authentic character
Reduced-Spend Variations
Thrift store ceramics: Vases, bowls, and decorative objects from Goodwill and estate sales cost one to five dollars and look identical to pieces selling for thirty to fifty dollars at home stores. Go for organic shapes in neutral colors — white, cream, terracotta, and warm stone tones.
Dollar Tree frames: Small Dollar Tree frames with the stock photos removed and replaced with printed art, postcards, or pages from old books create charming display pieces for a dollar each.
Library book sales: Vintage hardcover books with beautiful spines cost fifty cents to two dollars at library sales. Choose books with cloth covers in complementary colors for a coordinated but collected look.
Nature is free: Dried branches, interesting rocks, shells, seed pods, and dried flowers cost nothing and add organic texture that no store-bought item can match. Press interesting leaves or flowers in a frame for instant wall art.
How It Comes Together
- Stack books both ways — some vertical, some horizontal. Horizontal stacks create platforms for small objects to sit on, adding height and dimension to the arrangement
- Group in odd numbers — clusters of three or five objects look more natural and visually pleasing than pairs or quads. This is a universal design principle that always works
- One color story per shelf — each shelf should have a loose color theme even if the overall unit is mixed. This creates visual coherence within the variety
- Lean art instead of hanging — small prints and postcards leaned against the back of the shelf feel casual and collected. Layer them in front of or behind other objects for depth
- Rotate seasonally — swap out one or two items per shelf each season. Fresh spring stems replace winter pinecones, a bright ceramic replaces a moody one. Small changes keep the display feeling alive
- Use the rule of threes for materials — aim for at least three different materials on each shelf: wood, ceramic, brass, glass, plant, fabric. The variety is what creates richness
Where to Apply This
Living Room Built-Ins
Floor-to-ceiling built-in shelving styled with a mix of art books, ceramic vases in varying heights, a few brass candlesticks, small potted plants, and framed art prints leaned at angles. The arrangement follows the zigzag rule — tall pieces alternate sides from shelf to shelf. Generous empty space between groupings makes each cluster feel intentional and gallery-like.
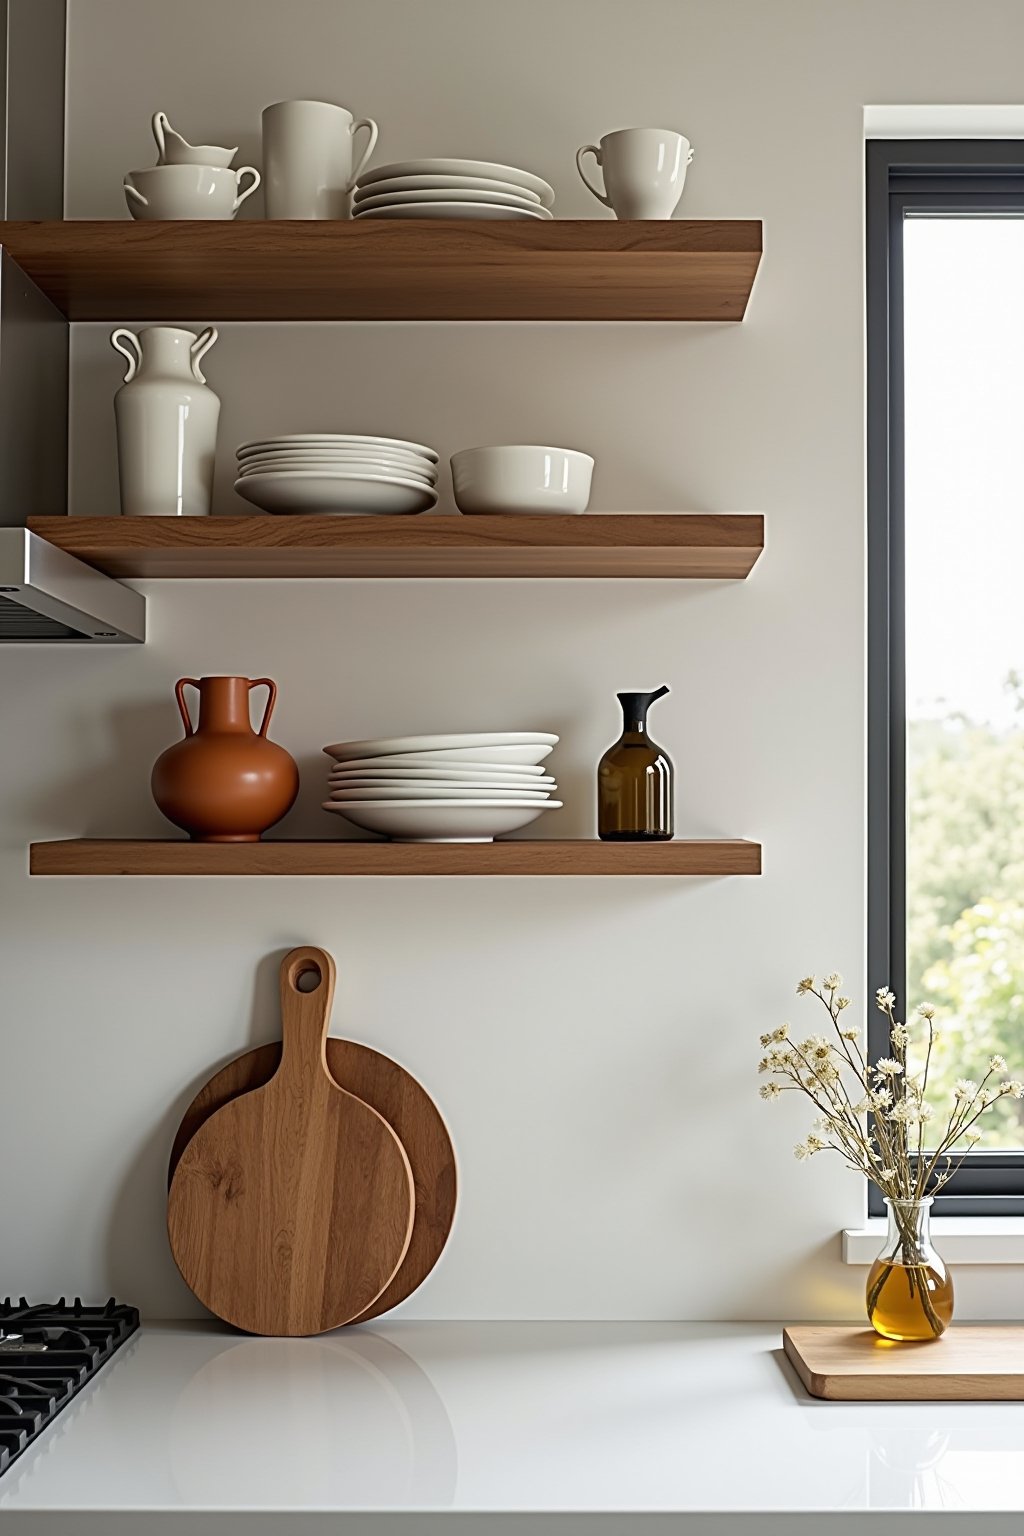
Open Kitchen Shelving
Wooden floating shelves with a curated mix of everyday dishes and decorative pieces. White ceramic plates and bowls stacked neatly alongside a thrifted terracotta vase, a small olive oil cruet, and a cutting board leaned against the wall. The combination of functional and decorative makes the kitchen feel warm and lived-in rather than sterile.
Bedroom Bookshelf
A small bookcase styled with a collection of novels and art books, a brass desk lamp, a ceramic vase with dried eucalyptus, a framed vintage botanical print, and a few personal objects. The palette stays within cream, warm wood, and muted green for a calming, cohesive display that doubles as bedroom decor.
Common Questions
How many items should I put on each shelf?
For a standard three-foot shelf, five to seven items maximum including books. Fewer items with more space between them always looks better than cramming every inch. If a shelf feels busy, remove two things.
Where do I find affordable vintage pieces for shelf styling?
Goodwill, Salvation Army, estate sales, flea markets, garage sales, and Facebook Marketplace. Focus on ceramics, brass objects, small frames, and vintage books. Most styling-worthy pieces cost one to five dollars at thrift stores.
How do I make thrift store pieces look intentional together?
Unify them with a shared color palette or material. Three different thrifted brass pieces grouped together look like a curated collection. A coat of spray paint in the same color can also unify mismatched ceramics.
Should I match my shelf decor to the rest of the room?
Pull two or three colors from your room palette onto the shelves for cohesion, but do not match everything perfectly. Shelves should feel like a complementary layer that adds personality, not a matchy extension of the room.
How often should I restyle my shelves?
A full restyle two to four times per year keeps things fresh. Between restyles, swap just one or two items — replace dead plants, update the seasonal element, or rotate in a new book. Small tweaks are easier and more effective than complete overhauls.
What if my shelves are very deep or very narrow?
Deep shelves benefit from layering — place objects in front of each other at varying depths. Narrow shelves work best with slim items like books, small frames, and narrow vases. Adjust your object sizes to match your shelf dimensions.