I pulled the straw out of my Stanley tumbler one morning to refill it and almost dropped the whole thing. There was a ring of dark, fuzzy mold growing inside the straw connector — the part that sits hidden under the lid where you never think to look. I’d been drinking from this cup every single day for weeks without ever cleaning beyond a basic rinse.
When I posted about it in a cleaning group, I expected a few sympathetic replies. Instead, I got hundreds of messages from people who had discovered the exact same thing. Turns out, the design that makes Stanley cups so great at keeping drinks cold also creates the perfect dark, moist environment for mold and bacteria to thrive. If you own a Stanley — or any insulated tumbler with a straw lid — this guide will show you exactly how to clean every hidden crevice and prevent mold from growing in the first place.
| ⏱ Time Required: | 10-15 minutes |
| 📈 Difficulty: | Easy |
| 💰 Supplies Cost: | $0-5 |
| 🔄 How Often: | Weekly (deep clean monthly) |
What’s Behind It
- Targets the hidden mold zones — most people only wash the cup itself but ignore the lid gasket, straw connector, and splash guard where mold actually grows
- Uses supplies you already have — baking soda, white vinegar, and a bottle brush are all you need for daily and deep cleaning
- Prevents mold before it starts — the drying routine alone eliminates 90 percent of mold issues by removing the moisture mold needs to grow
- Works for all Stanley models — whether you have the Quencher H2.0, Classic, or IceFlow, the lid mechanisms are similar enough that these methods apply
- Takes under 5 minutes daily — once you build the habit, keeping your Stanley mold-free is faster than making your morning coffee
- Extends the life of your tumbler — regular cleaning prevents staining, odor absorption, and gasket deterioration that leads to leaks
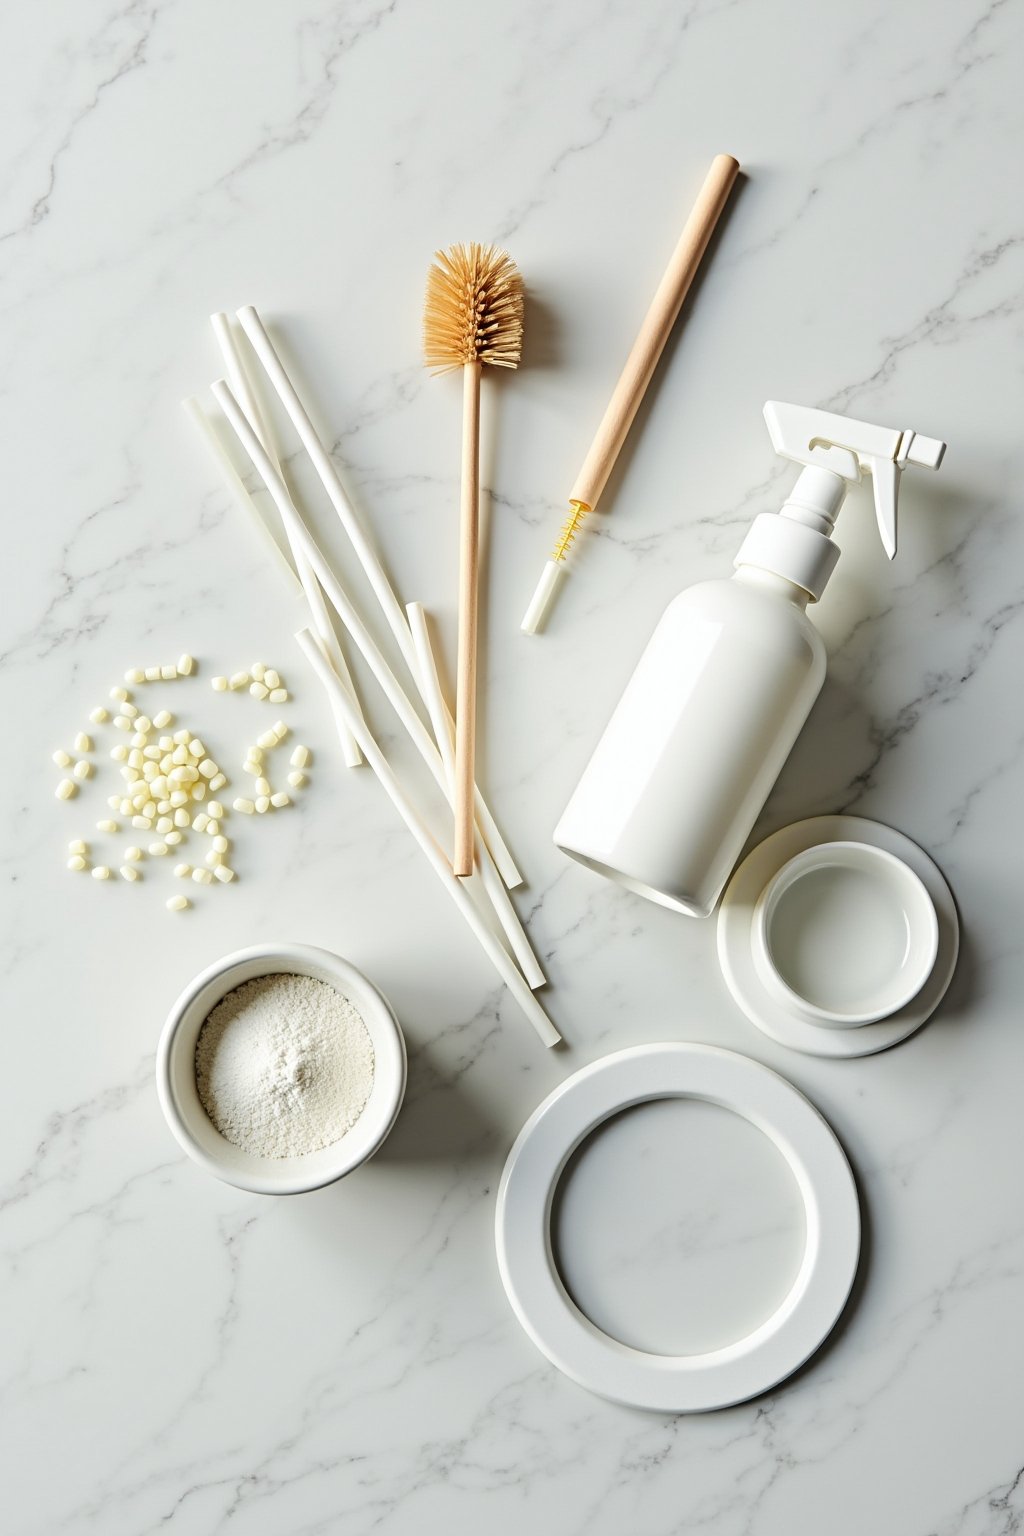
What You’ll Need
Gather these supplies before you start. Most of them are already in your kitchen:
- Bottle brush — a long-handled brush that reaches the bottom of the tumbler; a standard kitchen bottle brush works perfectly
- Straw cleaning brush — a thin, flexible brush specifically sized for straws; these come in packs of 10 for a couple of dollars
- Baking soda — natural deodorizer and mild abrasive for removing stains and buildup inside the cup
- White distilled vinegar — kills mold spores and dissolves mineral deposits without harsh chemicals
- Dish soap — basic liquid dish soap for daily washing
- Small bowl or container — for soaking the lid components separately from the cup
- Clean towel or drying rack — for air-drying all disassembled parts completely before reassembly
From Start to Finish
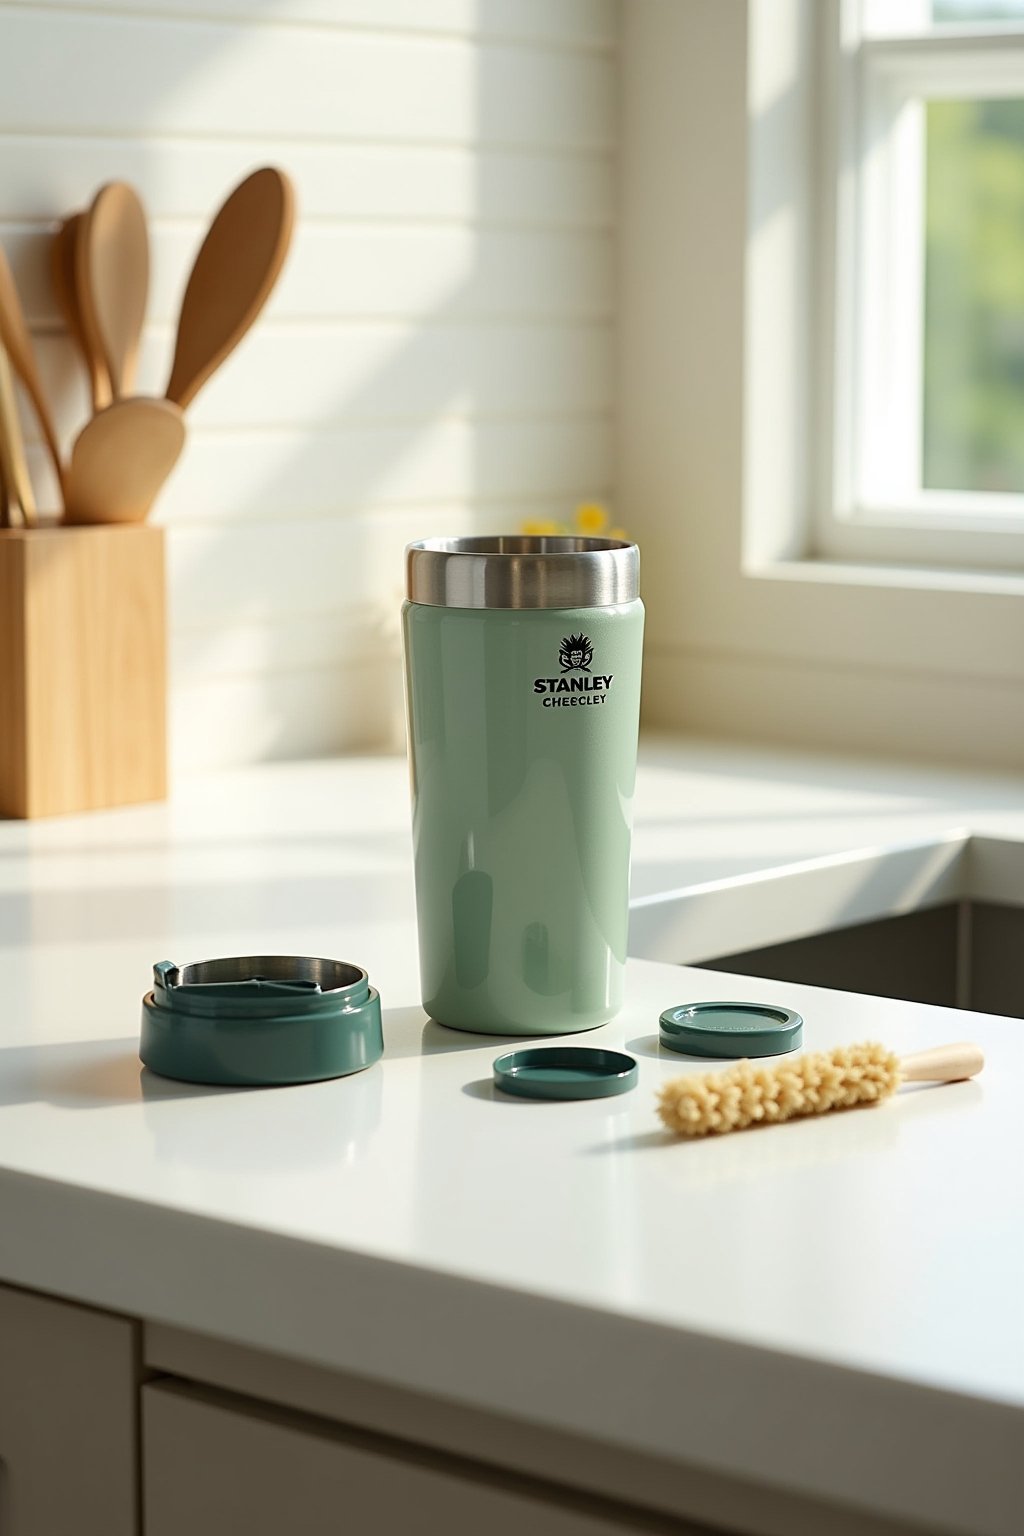
Fully Disassemble the Lid (Yes, It Comes Apart)
This is the step most people skip entirely, and it’s the reason mold grows in the first place. Your Stanley lid has multiple components that separate for cleaning. On the Quencher H2.0 (the most popular model), pull the straw straight out of the lid. Then locate the silicone gasket — it’s the rubber ring that sits in the underside of the lid creating the seal. Pry it out gently with your fingernail or a butter knife. On some models, there’s also a splash guard or flow-control piece that pops out.
The first time I did this, I found a slimy brown residue under the gasket that had been there for who knows how long. That gasket traps moisture and liquid every single time you drink, creating a biofilm that eventually becomes visible mold. If your gasket is discolored, stiff, or smells off even after cleaning, it may need to be replaced — Stanley sells replacement lids and gaskets on their website. Once everything is disassembled, you should have the cup body, the lid shell, the gasket, the straw, and any additional flow pieces laid out separately.
Deep Clean the Cup Body
Add one tablespoon of baking soda and one tablespoon of white vinegar to the empty tumbler. It will fizz — that’s normal. Fill the rest with warm (not boiling) water and let it soak for 15 minutes. The baking soda neutralizes odors that have been absorbed into the stainless steel, while the vinegar kills bacteria and dissolves any mineral deposits from hard water or flavored drinks.
After soaking, scrub the interior thoroughly with a bottle brush, paying special attention to the bottom where residue settles. Rinse completely with warm water. If you notice coffee or tea staining that won’t budge, make a thicker paste of baking soda and a few drops of water, apply it directly to the stains, let it sit for 10 minutes, then scrub. Never use bleach inside a stainless steel tumbler — it can damage the vacuum insulation seal and cause pitting on the steel surface. Also avoid putting your Stanley in the dishwasher despite what you may have heard — the high heat can warp the vacuum seal over time and void the warranty.
Soak and Scrub the Lid Components
Place the lid shell, gasket, straw, and any other disassembled pieces in a bowl filled with equal parts warm water and white vinegar. Let them soak for 20 to 30 minutes. The vinegar penetrates the tiny crevices in the lid mechanism where mold spores hide — places a sponge or cloth simply can’t reach.
After soaking, use a straw brush to scrub the inside of the straw from both ends. Push the brush all the way through and pull it back several times. For the gasket, rub it between your fingers under running water, feeling for any slimy spots. Scrub the lid’s underside where the gasket sits with an old toothbrush — there are usually grooves and channels here that collect residue. If you see black spots on the gasket that don’t come off with scrubbing, soak it in a solution of one tablespoon of baking soda per cup of warm water for an additional hour. If the spots remain, the mold has penetrated the silicone and the gasket needs replacing.
The Correct Daily Cleaning Routine
Deep cleaning handles existing buildup, but a quick daily routine prevents it from returning. Every evening, empty any remaining liquid, disassemble the lid (just the straw and gasket — it takes five seconds once you’re used to it), and wash all pieces with dish soap and warm water. Scrub the cup interior with your bottle brush and run the straw brush through the straw once.
The critical step most people miss is drying. Don’t reassemble the lid while it’s still wet. Place all components on a clean towel or drying rack with the cup upside down and the lid pieces spread out so air circulates around each one. Mold needs moisture to grow — if every part is completely dry before reassembly, mold simply cannot establish itself. I leave mine disassembled on the drying rack overnight and reassemble in the morning. This single habit eliminated my mold problem entirely.
Prevent Mold and Odors Long-Term
Beyond daily cleaning, there are a few habits that dramatically reduce mold risk. First, never leave liquid sitting in your Stanley overnight. Even water creates a moist environment that feeds bacteria and mold once it sits for 8 to 12 hours. Second, if you drink anything other than water — coffee, juice, smoothies, flavored water — rinse the cup immediately after finishing. Sugary and acidic drinks accelerate bacterial growth significantly.
Third, do the full deep clean (baking soda, vinegar soak, straw scrub) once a week. Mark it on your calendar or tie it to a weekly habit like laundry day. Fourth, replace your straw every two to three months, even if it looks clean. Straws are inexpensive and the interior surface degrades over time, creating microscopic scratches where bacteria hide. Finally, store your Stanley with the lid off when not in use. A sealed, empty tumbler with any trace of moisture inside is a mold incubator. Leave the lid off and let air circulate.
The First Things to Check
- Only rinsing without disassembling the lid — water alone cannot reach the gasket groove, straw connector, or splash guard where mold actually grows; you must take it apart
- Using the dishwasher regularly — while Stanley says their newer cups are dishwasher-safe, repeated high-heat cycles can weaken the vacuum seal and warp the lid; hand washing is always safer
- Reassembling while still wet — this is the number one cause of mold in Stanley cups; every component must be completely dry before you put it back together
- Using bleach or harsh chemicals inside the tumbler — bleach damages stainless steel and can compromise the vacuum insulation; stick to baking soda and vinegar which are equally effective and safe
- Ignoring the replacement schedule for straws and gaskets — silicone degrades with use and cleaning; replace straws every 2-3 months and gaskets every 6 months for optimal hygiene
When This Pays Off
Kitchen Counter Routine
Keep your bottle brush and straw brush next to the dish soap by your sink. When you wash dishes after dinner, adding the Stanley disassembly takes less than a minute. Lay the pieces on a clean towel beside the drying rack. This makes the habit automatic — you’re already doing dishes, so the Stanley just becomes part of the flow.
Office or Desk Setup
If you keep your Stanley at work, bring a small straw brush in your desk drawer. Do a midday rinse if you’re drinking anything flavored or sugary. At minimum, empty and open the lid before you leave for the day so it’s not sealed shut for 16 hours. A sealed tumbler with a half-inch of smoothie residue in 72-degree office air is mold’s dream environment.
Car and On-the-Go
Your car cup holder is where Stanley cups spend the most time sealed with liquid inside. Keep a small bottle of dish soap and a straw brush in your glove box or bag. If you’re on a road trip, rinse and open the lid at every stop. Heat from parked cars accelerates bacterial growth dramatically — never leave a Stanley with liquid in a hot car for hours.
Common Questions
How do I know if my Stanley Cup has mold?
Remove the straw and pull out the silicone gasket from the lid. Look for black, brown, or green spots on the gasket, inside the straw connector, and in the grooves under the lid. Also smell the lid — a musty or sour odor even after rinsing indicates bacterial or mold growth in a hidden area.
Can I put my Stanley in the dishwasher?
Stanley’s newer models are labeled dishwasher-safe, but hand washing is recommended for longevity. The high heat can gradually weaken the vacuum seal that keeps your drinks cold, and the lid components can warp or degrade faster. If you do use the dishwasher, place it on the top rack only.
How often should I deep clean my Stanley Cup?
Do a full deep clean with baking soda and vinegar once a week if you use it daily. If you only drink water from it, every two weeks is fine. If you regularly drink coffee, juice, or smoothies, weekly deep cleaning is essential because sugary and acidic residues feed bacteria much faster than water alone.
Is the mold in my Stanley Cup dangerous?
Most mold found in water bottles and tumblers is common environmental mold that isn’t dangerous in small amounts for healthy adults. However, it can cause allergic reactions, digestive discomfort, and respiratory irritation in sensitive individuals. People with compromised immune systems or mold allergies should be especially diligent about tumbler hygiene.
Why does my Stanley Cup smell bad even after washing?
Odors persist when bacteria or mold is hiding in areas you haven’t reached — usually under the gasket, inside the straw, or in the lid’s internal channels. A full disassembly and vinegar soak will eliminate the smell. If the odor is in the cup body itself, the stainless steel may have absorbed flavors; a baking soda paste left overnight usually resolves this.
Can I use denture cleaning tablets to clean my Stanley?
Yes, denture tablets are an effective alternative to the baking soda and vinegar method. Drop one tablet into the cup filled with warm water, let it fizz for 30 minutes, then scrub and rinse. They’re especially good at removing coffee and tea stains. For the lid components, dissolve a tablet in a separate bowl and soak the pieces for the same duration.