My first tomato plant lived in a five-dollar bucket on a third-floor fire escape. It got battered by wind, baked by afternoon sun reflecting off brick, and I watered it with a kitchen pitcher because I did not own a hose. That plant produced 47 cherry tomatoes. I counted every single one because I could not believe something that good could come from something that simple.
You do not need a backyard, a garden bed, or even a balcony railing to grow tomatoes. A single large pot on a sunny stoop, patio, or apartment balcony is enough. Container tomatoes can match or beat garden-grown tomatoes if you pick the right variety, use the right pot size, and nail the watering schedule. Here is exactly how to do it in any USDA zone from 5 to 9.
Quick Facts
| Sun | Full Sun (6-8 hours minimum, 8+ is better) |
| Difficulty | Beginner |
| Season | Plant after last frost (April zone 8-9, May zone 5-7) |
| Zone | Zones 5-9 (containers are portable) |
| Time to Harvest | 60-80 days from transplant depending on variety |
Gather These
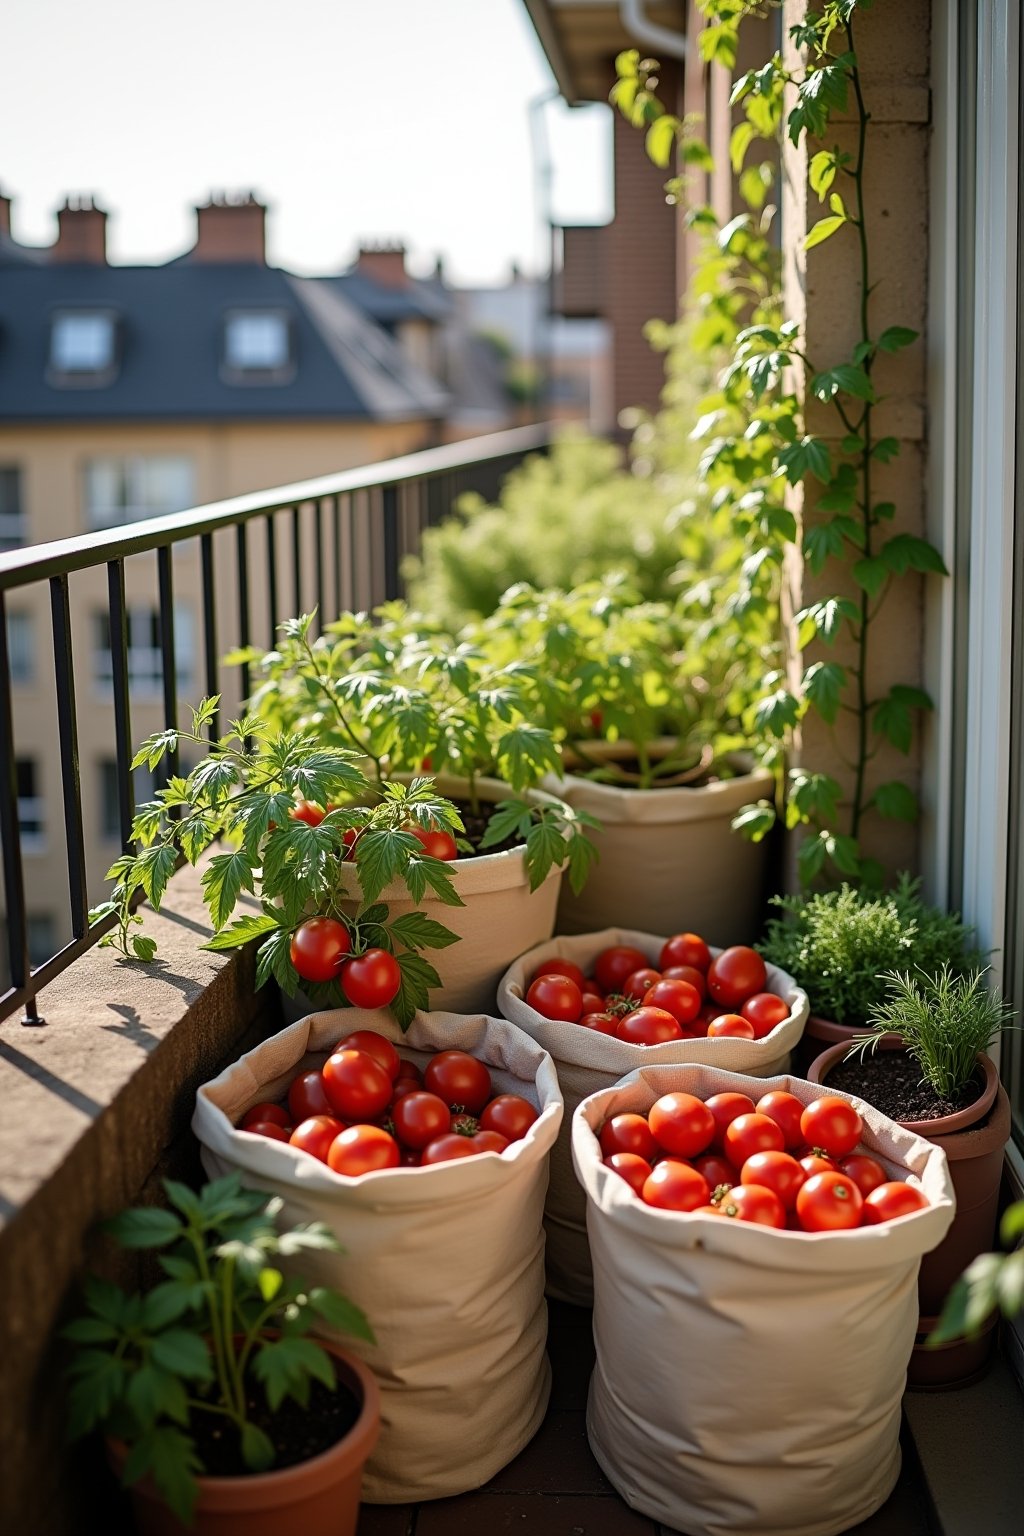
- Large container: 5-gallon minimum, 10-20 gallon ideal (fabric grow bags work great)
- Quality potting mix (not garden soil — it compacts in pots)
- Compost to blend with potting mix (2/3 potting mix, 1/3 compost)
- Tomato transplant or started plant from garden center
- Tomato cage, stake, or trellis for support
- Tomato or vegetable fertilizer (5-10-10 or similar low-nitrogen formula)
- Mulch (straw or shredded leaves) for the pot surface
- Watering can or drip system with timer
- Saucer (optional — remove excess water after 30 minutes)
- Plant dolly with wheels (for heavy pots you need to move)
Fabric grow bags are a game-changer for container tomatoes: They are lightweight, breathable, prevent root circling, drain perfectly, and cost a fraction of ceramic or terracotta pots. The breathable fabric keeps roots cooler in summer heat and prevents the waterlogging that kills tomatoes in traditional plastic pots. A 10-gallon fabric bag is the sweet spot for one tomato plant.
Do not use garden soil in containers: This is the number one mistake. Garden soil compacts in pots, blocks oxygen from reaching roots, holds too much water, and often carries diseases. Use a 2/3 potting mix, 1/3 compost blend for the perfect balance of drainage, aeration, and nutrition.
Step 1: Choose the Right Tomato Variety for Pots
Not all tomatoes are created equal for containers. You need to understand the difference between determinate and indeterminate varieties.
Determinate (bush) tomatoes grow to a fixed height (3-4 feet), set all their fruit at once, and stop growing. They are perfect for containers because they stay compact and need minimal staking. Best varieties: Patio Princess, Bush Early Girl, Celebrity, Roma (for sauce).
Indeterminate (vining) tomatoes keep growing all season and can reach 6-8 feet. They produce fruit continuously but need strong support. You can grow them in large containers (15+ gallons) with a sturdy cage. Best container indeterminates: Sweet 100 (cherry), Sungold (cherry), Better Boy.
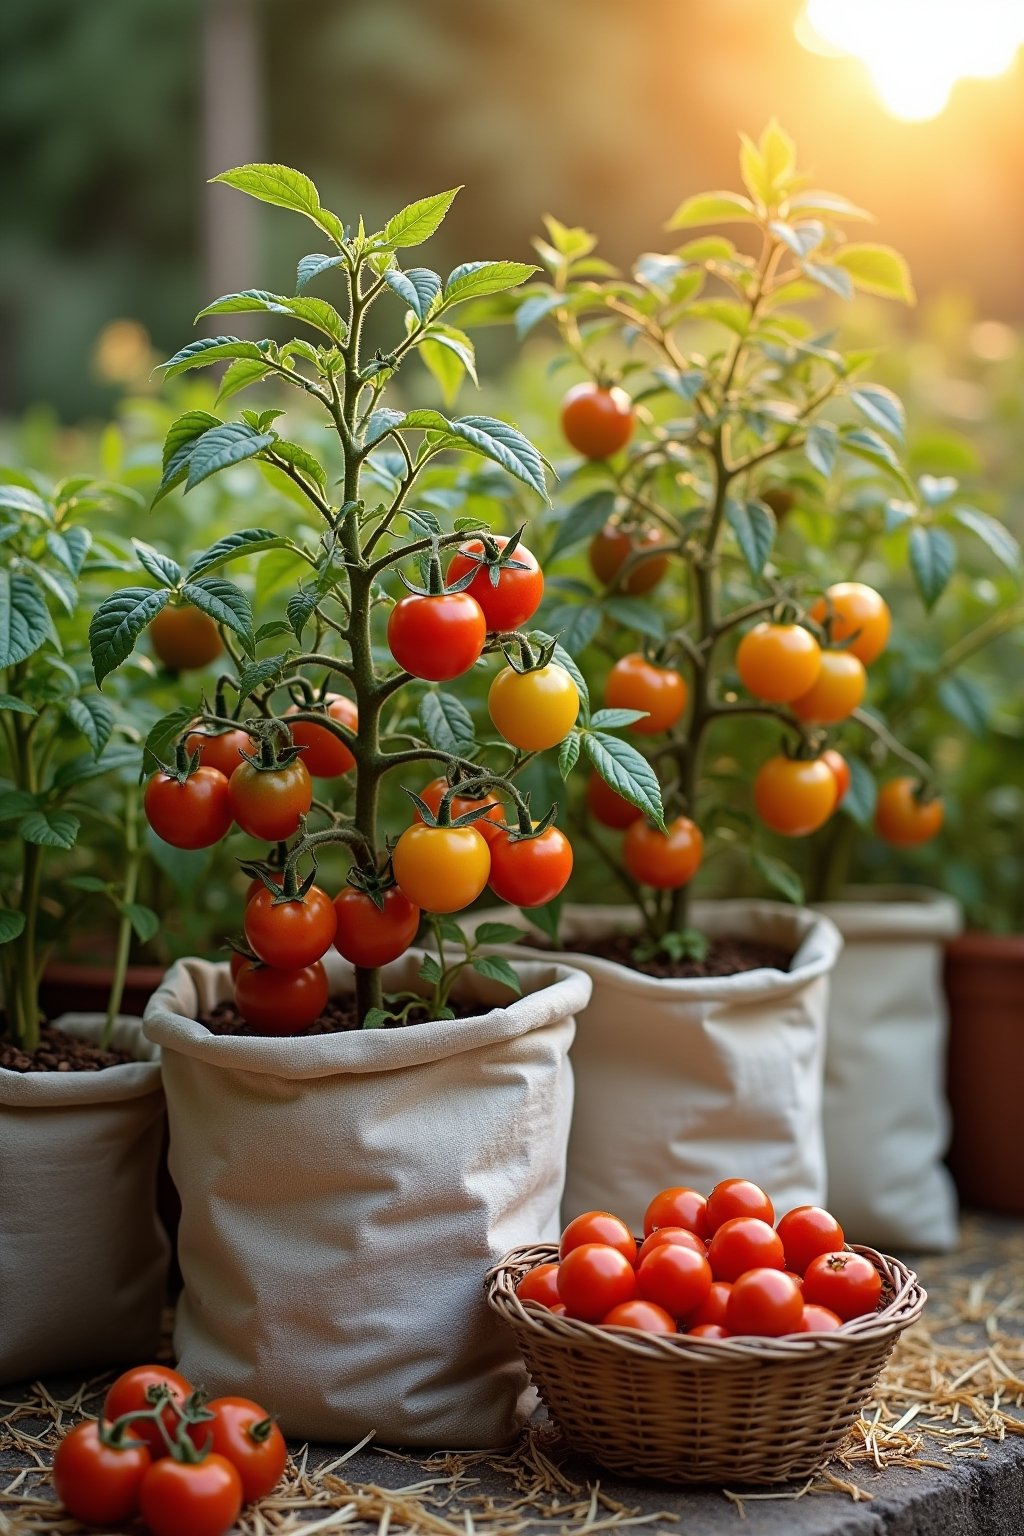
Cherry tomatoes are the best choice for beginners — they are the most forgiving, most productive, and most disease-resistant type. One Sweet 100 plant in a 10-gallon pot can produce over 200 tomatoes in a single season.
Step 2: Pick the Right Container Size
Bigger is always better for container tomatoes. Five gallons is the absolute minimum for a small determinate variety. Ten to fifteen gallons is ideal for most varieties. Twenty gallons lets you grow full-size indeterminate plants that rival garden-grown tomatoes.
The pot must have drainage holes. Drill extras if needed — tomatoes die fast in waterlogged soil. Fabric grow bags have built-in drainage through the fabric walls and are the easiest option. Dark-colored pots absorb heat and can cook roots in zones 8-9 — use light-colored pots or wrap dark pots with burlap or a towel. Elevate pots on bricks or a plant stand for better airflow underneath.
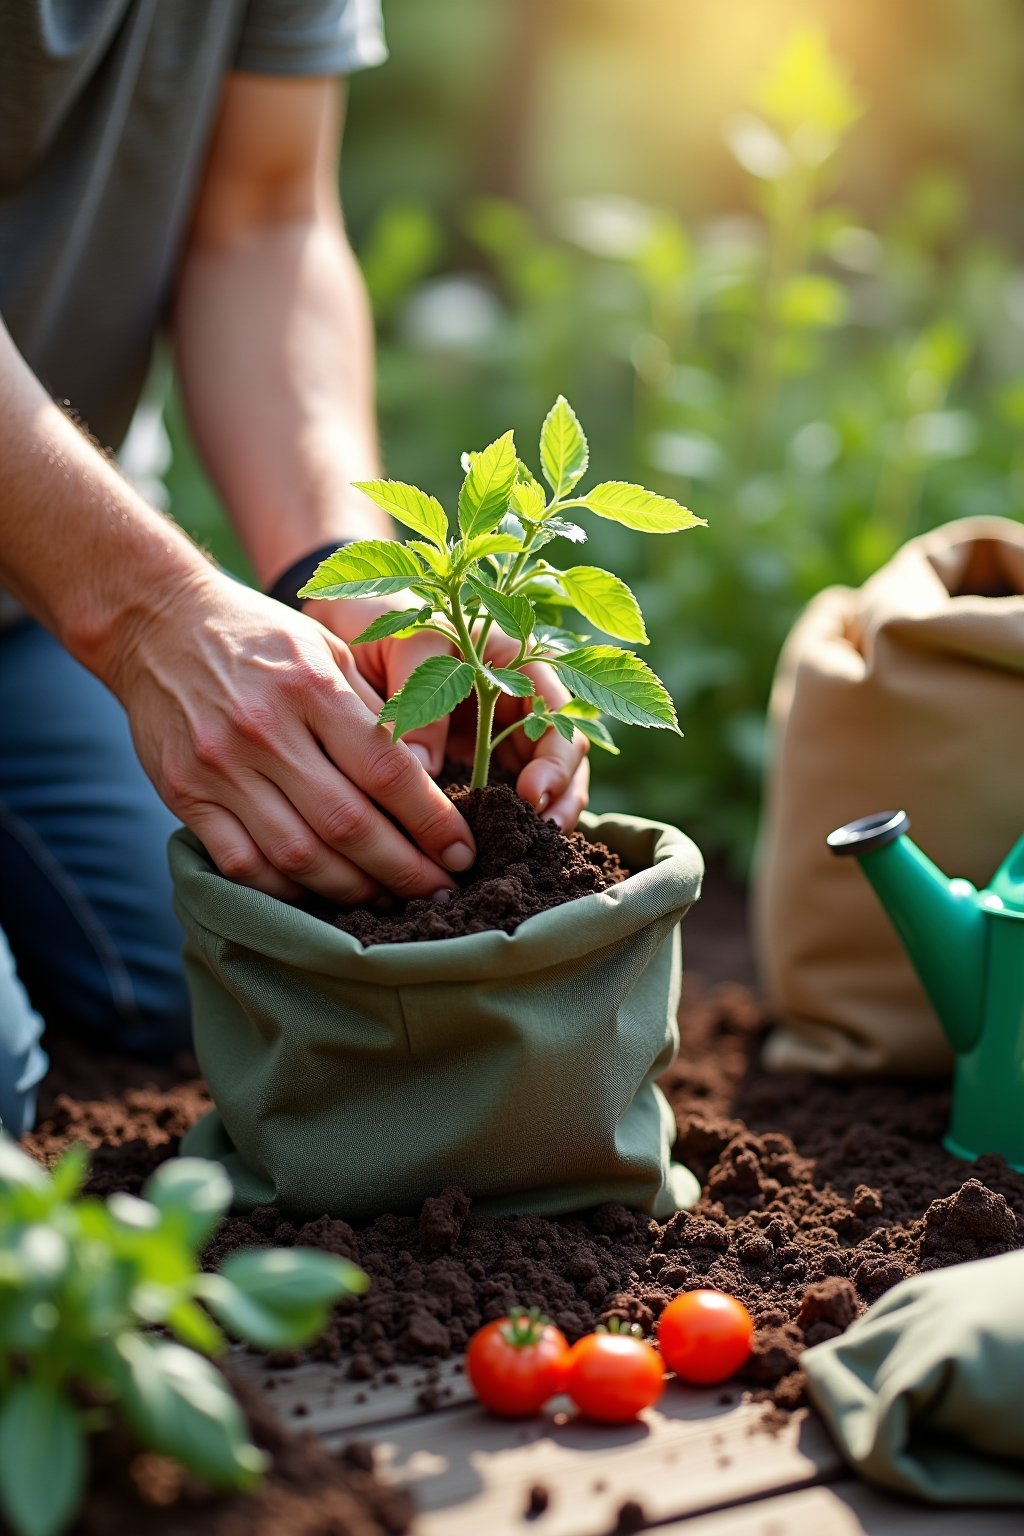
Step 3: Plant Deep for Stronger Roots
Here is a secret most beginners do not know: bury tomato stems deep. Remove the bottom leaves and bury the plant up to the top set of leaves. Every inch of buried stem grows new roots, creating a massive root system that makes your plant stronger, more drought-resistant, and more productive.
Fill the pot 2/3 full with your soil mix. Place the transplant deep — only the top 4-6 inches of stem and leaves should be above the soil line. Fill around the stem and water deeply to settle the soil. Install your cage or stake at planting time to avoid disturbing roots later.
Step 4: Master the Watering Schedule
Watering is the single biggest challenge with container tomatoes. Pots dry out much faster than garden beds, especially in summer heat. Here is the schedule that works:
Spring (after planting): Water every 2-3 days or when the top inch of soil feels dry. Summer (growing and fruiting): Water daily, sometimes twice daily in zones 8-9 or during heat waves. A 10-gallon pot in full sun on a 95°F day can lose a gallon of water through evaporation.
The golden rules: Water deeply until it drains from the bottom. Water in the morning so leaves dry before evening (wet leaves at night invite disease). Never let the soil swing from bone-dry to soaking wet — this inconsistency causes blossom end rot and cracked fruit. A drip system on a timer is the best insurance.
Step 5: Feed for Maximum Fruit Production
Container tomatoes need more fertilizer than garden tomatoes because nutrients wash out with every watering. Start feeding 2-3 weeks after planting with a low-nitrogen, high-phosphorus fertilizer (5-10-10 or tomato-specific formula).
Feed every 2 weeks through the growing season. Switch to a bloom-boosting formula once flowers appear. Avoid high-nitrogen fertilizers — they produce lush green foliage but fewer tomatoes. Organic options like fish emulsion (for early growth) and bone meal (for flowering) work well. Stop fertilizing when the first frost is 4 weeks away to let fruit ripen and the plant wind down naturally.
Step 6: Prune and Support for a Better Harvest
Remove suckers on indeterminate varieties. Suckers are shoots that grow in the V between the main stem and a branch. Left alone, each sucker becomes a new vine that diverts energy from fruit production. Pinch them out when they are small (under 2 inches). For container plants, keep 1-2 main stems maximum.
Determinate varieties do not need sucker pruning — their growth is self-limiting and removing suckers reduces your harvest. Do remove any yellow or diseased lower leaves on all varieties to improve airflow. Tie stems loosely to the cage or stake as they grow, leaving room for the stem to thicken.
Troubleshooting
Blossom end rot (dark, sunken spots on bottom of fruit): Caused by inconsistent watering, not calcium deficiency as commonly believed. The plant cannot transport calcium when soil swings between too dry and too wet. Water on a consistent schedule and mulch the soil surface to retain moisture.
Lots of flowers but no fruit: In temperatures above 90°F, tomato pollen becomes sterile and flowers drop without setting fruit. This is normal in zones 8-9 during peak summer. The plant resumes fruiting when temperatures cool in fall. Provide afternoon shade in hot zones.
Leaves curling upward: Usually heat stress or inconsistent watering. If the plant looks otherwise healthy, this is not a disease — just the plant conserving moisture. Water more frequently and add mulch.
Yellowing lower leaves: Normal as the plant ages. Remove yellow leaves to improve airflow. If yellowing spreads upward rapidly, check for overwatering or nitrogen deficiency.
Calendar Notes
Early Spring (March-April): Buy transplants from a local garden center or start seeds indoors 6-8 weeks before last frost. Choose varieties suited to containers. Prepare pots and soil mix.
Late Spring (After Last Frost): Plant transplants in containers. Zones 8-9 can plant in April. Zones 5-7 wait until May when nighttime temps stay above 50°F. Install cages at planting time.
Summer: Water daily (twice in extreme heat). Feed every 2 weeks. Remove suckers on indeterminate varieties. Harvest tomatoes when they are fully colored and slightly soft to the touch. Move pots to afternoon shade if temperatures exceed 95°F consistently.
Fall: As frost approaches, pick any remaining tomatoes (even green ones — they ripen on a sunny windowsill). After frost kills the plant, dump the old soil on a compost pile and clean pots for next year. Do not reuse potting mix for tomatoes — it may harbor diseases.
What Years Have Shown Me
- Fabric grow bags outperform every other container type for tomatoes — they prevent root circling, drain perfectly, keep roots cooler in summer, and fold flat for storage. A 10-gallon fabric bag costs under 5 dollars and lasts 3-5 seasons.
- Bury the stem deep for a stronger plant — remove lower leaves and bury 50-65% of the stem. Every buried inch grows new roots. This trick alone can double the root mass and dramatically improve the plant’s ability to absorb water and nutrients.
- Cherry tomatoes are the most forgiving for beginners — they set fruit in wider temperature ranges, resist diseases better, and produce far more tomatoes per plant than slicers. One Sweet 100 in a 10-gallon pot can give you 200+ cherry tomatoes.
- Consistent watering prevents blossom end rot — the dark sunken spots on the bottom of tomatoes are caused by inconsistent moisture, not lack of calcium. A drip system on a timer eliminates this problem entirely.
- Morning water, evening harvest — water in the morning so leaves dry before nightfall (preventing fungal disease). Harvest in the evening when sugars are highest and tomatoes taste the best.
- One large pot beats two small ones — a single 15-gallon container grows a better tomato plant than two 5-gallon containers because the larger soil volume buffers temperature and moisture swings.
Pages That Link Up
- Growing Tomatoes in 5-Gallon Buckets (Complete Container Guide)
- Container Gardening for Beginners: Everything You Need to Know
- How to Grow Tomatoes That Actually Taste Good (Mistakes Most Beginners Make)
Quick Answers
What size pot do I need to grow tomatoes?
Five gallons is the absolute minimum for small determinate varieties. Ten to fifteen gallons is ideal for most tomatoes. Twenty gallons lets you grow full-size indeterminate varieties. Bigger pots hold more moisture and nutrients, which means less watering and better harvests. A 10-gallon fabric grow bag is the best all-around choice for one tomato plant.
Can I grow tomatoes in a 5-gallon bucket?
Yes, but only small determinate or cherry tomato varieties. Drill 6-8 drainage holes in the bottom, fill with potting mix and compost, and plant one tomato per bucket. You will need to water daily in summer and fertilize every two weeks. Larger containers give better results, but 5-gallon buckets work in a pinch.
What is the best tomato variety for containers?
For beginners, cherry tomatoes like Sweet 100, Sungold, or Supersweet 100 are the most forgiving and productive. For slicing tomatoes, try Patio Princess, Bush Early Girl, or Celebrity (all determinate). For sauce tomatoes, Roma or San Marzano in large 15-gallon containers work well.
How often do I water tomatoes in pots?
In spring, every 2-3 days or when the top inch of soil is dry. In summer, daily — sometimes twice daily during heat waves. Container soil dries much faster than garden soil. Water deeply until it drains from the bottom. A drip system on a timer takes the guesswork out of watering and prevents the inconsistency that causes blossom end rot.
Why are my container tomatoes not producing fruit?
The three most common causes are temperatures above 90 degrees (pollen becomes sterile), too much nitrogen fertilizer (plant puts energy into leaves instead of fruit), and not enough sunlight (tomatoes need 6-8 hours of direct sun minimum). In hot zones, tomatoes often stop fruiting in July-August and resume in cooler September weather.
Can I reuse potting soil for tomatoes next year?
It is not recommended for tomatoes specifically because soil-borne diseases like blight can persist in used soil. Dump old tomato soil onto a compost pile and use fresh potting mix each season. You can reuse old tomato soil for non-nightshade crops like lettuce, herbs, or flowers.