There’s a universal truth about the space under the kitchen sink: nobody talks about it, everyone is embarrassed by it, and it’s been at least three years since anyone actually looked at what’s shoved back there. I know this because I asked my Instagram followers to send me photos of the space under their kitchen sinks, and the responses were equal parts hilarious and horrifying — leaking pipe puddles, mystery bottles from 2019, enough plastic bags to fill a dumpster, and cleaning products so old the labels had peeled off.
I decided to time myself organizing my own under-sink space from start to finish. Twenty-two minutes. That’s all it took to go from chaos to a space that makes me oddly happy every time I open the cabinet door. The secret is a specific method that prevents decision fatigue and keeps you moving through the process without getting stuck. Here’s exactly how to do it.
| ⏱ Time Required: | 25-40 minutes |
| 📈 Difficulty: | Some patience required |
| 💰 Supplies Cost: | Free with what you have |
| 🔄 How Often: | Every few weeks |
What Pulls Me Back
- The 20-minute time constraint prevents overthinking — a tight deadline forces quick decisions about what stays and what goes, eliminating the paralysis of perfectionism
- Addresses hidden water damage and leaks — the under-sink area is the most common location for undetected plumbing leaks that cause mold, wood rot, and pest infestations
- Creates a functional cleaning supply station — organizing this space means you can find the right product instantly instead of digging through a cluttered pile
- Reduces waste and duplicate buying — most people discover two or three bottles of the same product because they couldn’t find the first one in the mess
- Prevents pest problems — damp, cluttered spaces under sinks attract cockroaches, silverfish, and ants; cleaning and organizing removes their habitat
- Simple storage solutions maximize awkward space — the pipes make this a weird space, but the right organizers transform it into usable, accessible storage
Round Up
You need surprisingly little to transform this space. Most of the organizing happens during the declutter step:
- Trash bag — for expired products, rusty cans, and items that are beyond saving
- All-purpose cleaner and rags — for wiping down the cabinet interior after emptying
- Flashlight — for inspecting pipes and the back corners for leaks, mold, or pest signs
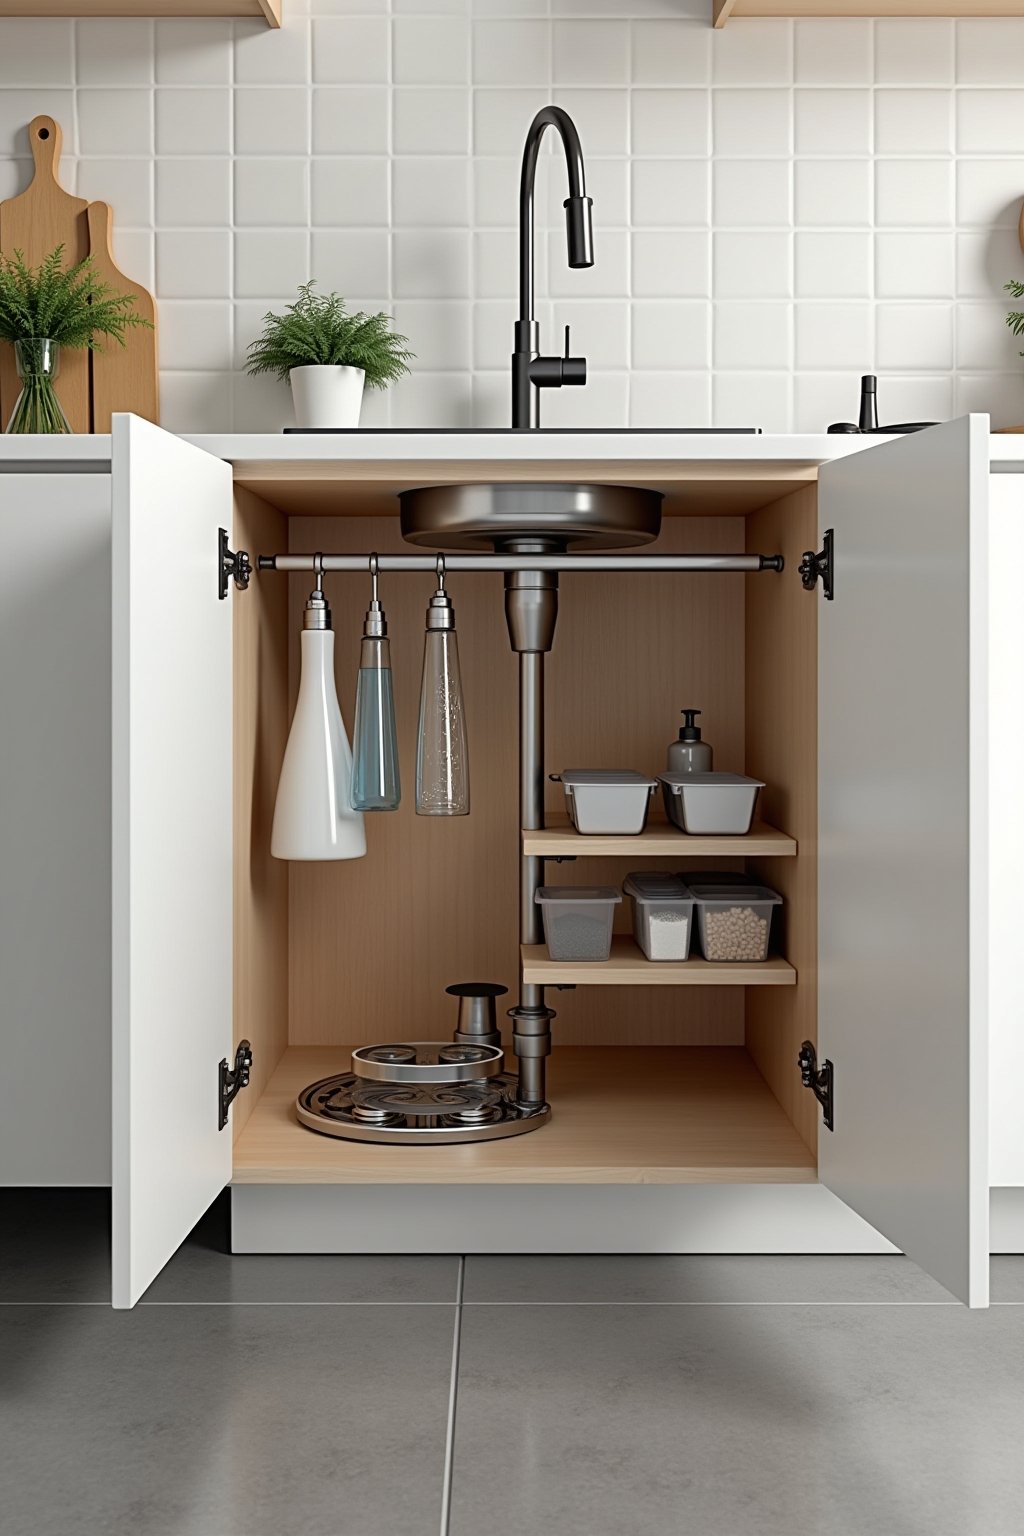
- Under-sink shelf organizer or stackable bins — a two-tier shelf that fits around pipes maximizes vertical space dramatically
- Small turntable or lazy Susan — perfect for deep cabinets where products get pushed to unreachable back corners
- Tension rod — an inexpensive curtain tension rod installed inside the cabinet creates instant hanging storage for spray bottles
- Shelf liner or waterproof mat — protects the cabinet floor from drips and makes future cleaning easy
How the Steps Stack Up
Minutes 1-3: The Complete Empty-Out
Set a timer for 20 minutes. Open the cabinet doors and pull everything out. Everything. Don’t sort as you go — just pull it all out and place it on the kitchen floor or counter. You will be surprised by how much is in there and how many items you forgot existed. Old sponges, expired cleaning products, a broken mousetrap, random tools, plastic bags stuffed into bags — it all comes out.
Resist the urge to start sorting or making decisions right now. The goal of this step is simply to empty the space completely so you can clean it and assess what you actually have. If something is obviously trash — a rusted can, a bone-dry sponge, a product with no label — toss it directly into the trash bag. Everything else goes on the floor for the next step. This should take no more than three minutes. If it’s taking longer, you’re decision-making instead of emptying. Just pull and place.
Minutes 3-7: Inspect, Clean, and Protect the Cabinet
With the cabinet empty, grab your flashlight and inspect the pipes, the back wall, the cabinet floor, and the corners. Look for water stains, soft or warped wood, mold spots, and evidence of pests (droppings, egg casings, or dead insects). Run your fingers along the pipe joints and fittings — any moisture means a slow leak that needs attention before you put anything back.
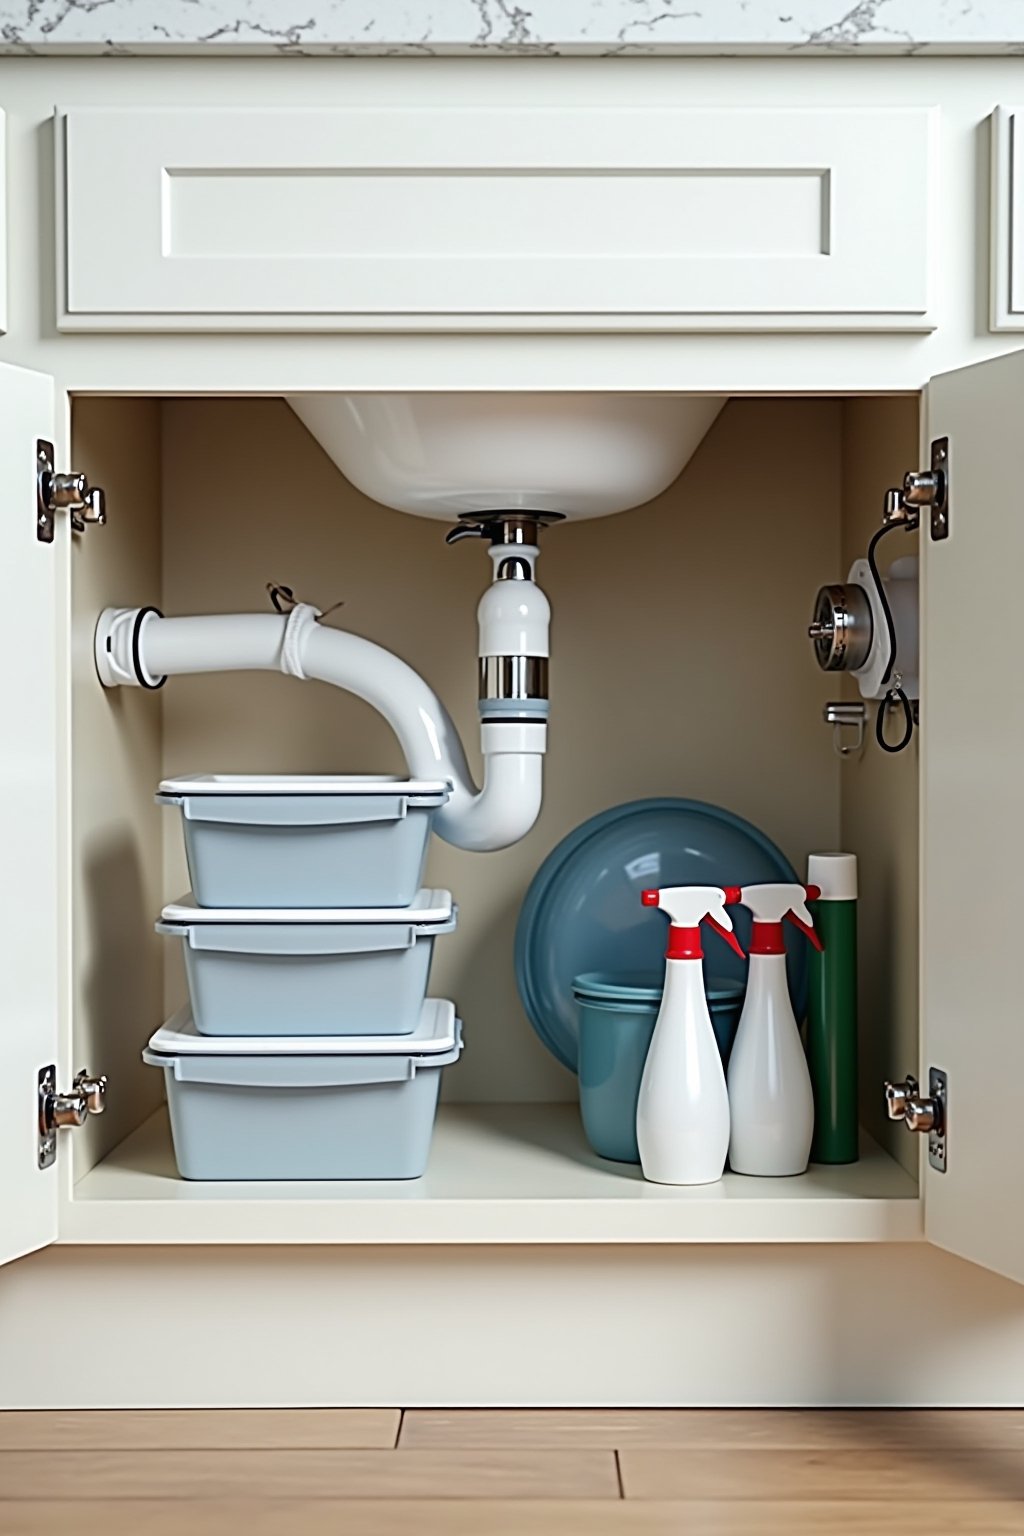
Spray the entire cabinet interior with all-purpose cleaner and wipe it down thoroughly. Pay special attention to the corners and the area directly beneath the pipe fittings where drips tend to land. Let it dry completely — even a few minutes of air drying makes a difference. If you found any mold, spray the area with a vinegar solution and let it sit for 10 minutes before wiping. Once dry, lay down a waterproof shelf liner or a silicone mat on the cabinet floor. This catches future drips, protects the wood from product spills, and makes cleanup infinitely easier next time. The mat takes 10 seconds to wipe down during routine cleaning.
Minutes 7-12: The Three-Pile Sort
Now turn to the pile on your floor and sort everything into three categories: keep, toss, and relocate. Toss anything expired, rusty, leaking, or unidentifiable. Check expiration dates on cleaning products — yes, they expire. Old bleach loses its effectiveness after about 6 months. Vinegar lasts years but heavily used bottles with little left should be consolidated. Duplicate products get consolidated too — pour two half-empty bottles of the same cleaner into one.
The relocate pile is for items that don’t belong under the sink at all. Extra batteries, tools, flashlights, takeout menus, and random household items often migrate here over time. Put them in a separate pile to deal with after the timer finishes. For the keep pile, group items by function: daily cleaning products together, specialty products together (oven cleaner, drain cleaner), dish supplies together, and trash bags and extra sponges together. This grouping makes the organizing step intuitive because you’ll put each group in its own zone.
Minutes 12-17: Organize with the Right Storage Setup
The under-sink space has an awkward shape because of the pipes, but three simple organizers transform it completely. First, install a tension rod across the top of the cabinet opening. Hang spray bottles by their trigger handles from the rod — this uses dead vertical space and keeps your most-used cleaners immediately visible and accessible. A single tension rod typically holds four to six spray bottles.
Second, place a small turntable (lazy Susan) in the back corner where items typically get pushed and forgotten. Put your less-frequently-used products on the turntable — specialty cleaners, furniture polish, silver cleaner, etc. When you need them, a quarter turn brings them to the front. Third, use a stackable shelf organizer or two small bins on the remaining floor space. Group daily items (dish soap refills, sponges, dish gloves) on the more accessible shelf and bulk items (extra trash bags, refill containers) on the less accessible one. Label the bins if you share the space with other family members. The entire storage setup costs under $20 and lasts for years.
Minutes 17-20: Final Touches and Leak Prevention
Place your grouped items back into the organized cabinet. Daily-use items go at the front within easy reach. Specialty and bulk items go toward the back on the turntable or upper shelf. Stand back and check that you can see and reach everything without moving other items around — that’s the test of a well-organized space.
For leak prevention, place a shallow plastic tray or a disposable aluminum pan directly under the pipe joints. If a slow leak develops, the tray catches it before it damages the cabinet floor and alerts you to the problem before it becomes serious. Check this tray every time you reach under the sink — any water in it means you need to tighten a fitting or call a plumber. Finally, do a quick inventory of what you actually have. You may discover you’ve been over-buying certain products or that you need to restock something you ran out of. Snap a photo of the finished space for motivation — and as a reference for maintaining it.
Watch For These
- Storing food items under the sink — the proximity to plumbing chemicals, potential leaks, and cleaning products makes this unsafe for any food or beverage storage
- Ignoring slow leaks — a small drip under the sink causes mold, wood rot, and pest infestations within weeks; check pipe joints every time you reach into this space
- Hoarding expired cleaning products — old bleach, expired disinfectants, and ancient spray bottles take up space and don’t work; check dates and consolidate regularly
- Stacking everything on the cabinet floor — without vertical storage (tension rod, shelf organizer), you waste 70 percent of the available space and can’t find anything
- Putting this off because it seems overwhelming — the actual job takes 20 minutes; the anxiety about doing it takes up far more mental space than the task itself
Worth It Moments
Kitchen Sink (Primary Focus)
The kitchen under-sink gets the most use and accumulates the most clutter. Prioritize daily cleaning supplies at the front, backup supplies at the back, and trash bags in the most accessible spot since you reach for them most often. Keep dishwasher detergent here too if your dishwasher is nearby. The tension rod for spray bottles makes the biggest impact in the kitchen because you likely have more spray products here than anywhere else.
Bathroom Sink Cabinet
Apply the same 20-minute method to bathroom under-sink cabinets. The main difference is the inventory: hair products, first-aid supplies, feminine products, and bathroom cleaners instead of kitchen items. Check for moisture more carefully here because bathroom plumbing leaks are extremely common and often go unnoticed behind closed cabinet doors.
Laundry Room Sink or Utility Sink
If you have a laundry room sink or utility sink, the under-sink space often becomes a catch-all for laundry supplies, cleaning products, and random household items. Apply the same sort, clean, and organize method. Use bins to separate laundry supplies from cleaning supplies from miscellaneous items. The turntable is especially useful in deep utility cabinets where products disappear into the back.
FAQ
What cleaning products should I actually keep under the kitchen sink?
At minimum: dish soap, an all-purpose spray, glass cleaner, and trash bags. Add a degreaser if you cook frequently, a drain cleaner for occasional use, and dishwasher pods if applicable. That’s usually 6-8 items total. If you have more than 15 products under your sink, you almost certainly have duplicates or products you never use.
How do I check for a leak under my sink?
Run the water with the cabinet doors open and a flashlight pointed at the pipe joints. Look for any drips at connection points, around the garbage disposal mount, and at the shut-off valves. Also check the cabinet floor for warping, discoloration, or soft spots. Place a dry paper towel under the joints and check it after an hour of normal sink use.
Is it safe to store cleaning chemicals next to each other under the sink?
Most common household cleaners are safe to store near each other as long as they’re sealed. The danger is mixing them during use, not storage. However, keep bleach-based products away from ammonia-based products as a precaution, and always store them upright to prevent leaking. Keep all cleaning products out of reach of children.
How do I prevent the under-sink area from getting cluttered again?
The one-in, one-out rule works well: every time you buy a new product, use up or discard an old one. Do a 5-minute declutter every month when you replace your trash bag roll. If something doesn’t fit in the organized space, that’s a signal that you have too much rather than too little storage.
What should I do if I find mold under my sink?
First, identify and fix the moisture source — usually a leaky pipe or condensation. Spray the mold with white vinegar (never bleach on wood), let it sit for 10 minutes, then scrub and wipe clean. Let the area dry completely before placing anything back. If the mold covers more than a square foot or the wood is soft and damaged, consider calling a professional.
How often should I reorganize under the sink?
A full reorganization once or twice a year is usually sufficient if you maintain the system with monthly quick checks. Every time you reach under the sink, take two seconds to put items back in their designated spots. The organized system only breaks down when people stop returning things to their zones — the initial setup is the hard part; maintenance is easy.