The dresser sitting in my guest room was a $30 Facebook Marketplace find. Ugly laminate, chipped edges, nothing special. After a weekend with some paint, a small brush, and a lot of patience, it became the most complimented piece of furniture in my house.
Hand-painted furniture is surging on Pinterest with searches up 135%. People are tired of mass-produced, identical furniture. Painting a unique design onto an old piece gives it character, personality, and a story. And you absolutely do not need to be an artist to do it.
Why This Works
- Saves furniture from landfills — transform what you already have or thrifted finds
- Completely unique — no one else will have the same piece
- Low cost, high impact — paint and brushes cost under $50 for a stunning transformation
- No artistic skill required — stencils, tape, and simple techniques create professional results
- Works on any furniture — dressers, nightstands, chairs, tables, cabinets, desks
What You’ll Need
Supplies for painting furniture by hand:
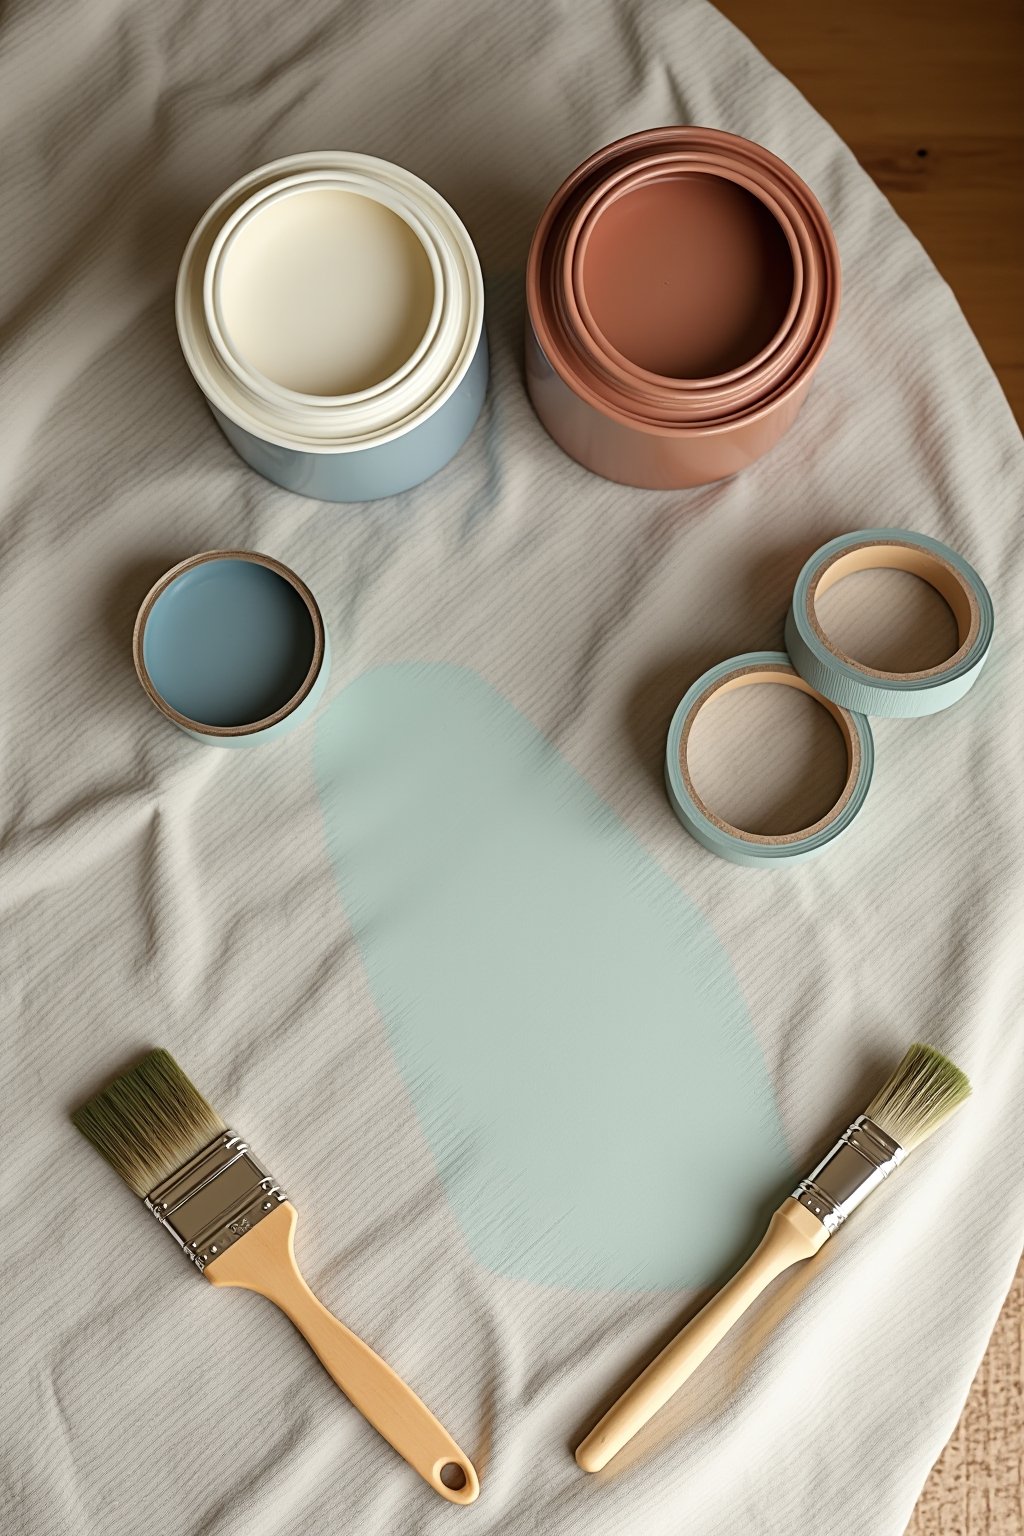
- Furniture or chalk paint — in your chosen colors (Annie Sloan, Fusion, or craft store chalk paint)
- Primer — bonding primer for laminate or slick surfaces
- Artist brushes — small round and flat brushes for detail work
- Stencils — optional, for patterns and geometric designs
- Painter’s tape — for geometric patterns and clean lines
- Clear protective topcoat — polyurethane or wax for durability
- Sandpaper — 150-grit for prep, 220-grit for smoothing between coats
Step-by-Step Guide
Choose Your Piece and Design
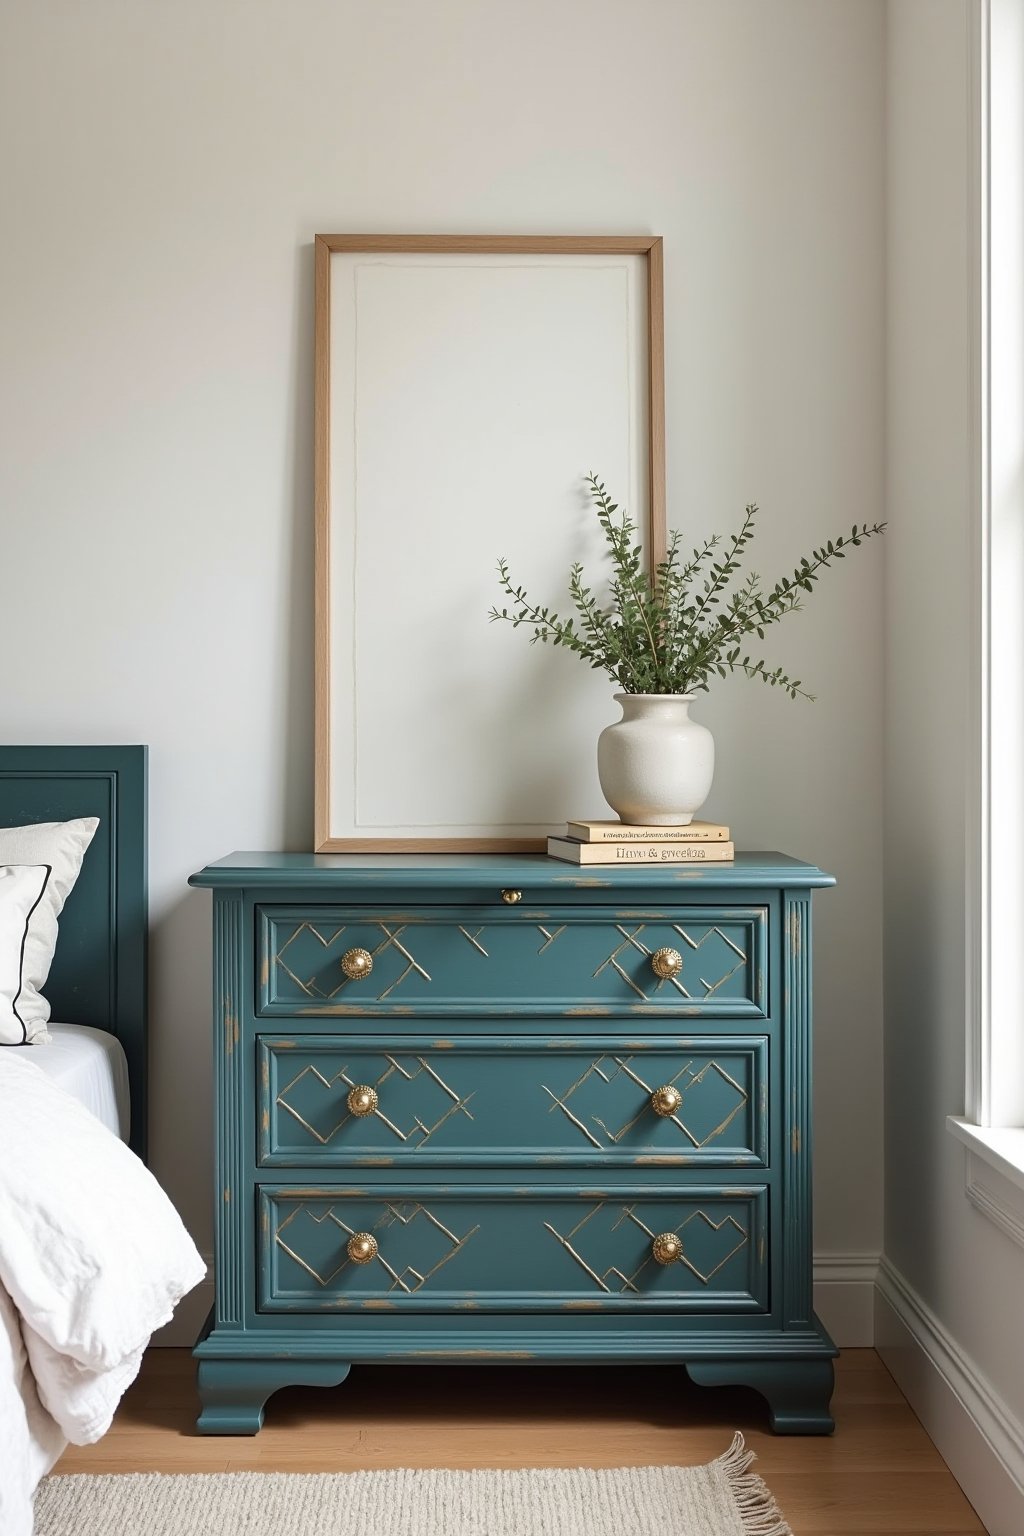
Start with a piece that has good bones — solid construction, interesting shape. Flat surfaces are easiest for beginners. Popular designs include: geometric color blocks, floral motifs, abstract patterns, faux bone inlay, and scalloped edges.
Search Pinterest for “painted furniture ideas” to find a design that matches your skill level and home style.
Prep the Surface
Clean the piece thoroughly with TSP or a degreaser. Sand lightly with 150-grit sandpaper. If the piece is laminate, apply bonding primer. For raw wood, regular primer works fine.
Fill any chips, dents, or holes with wood filler. Sand smooth when dry. Good prep = good results.
Apply Your Base Color
Paint the entire piece in your base color — typically the lighter shade. Apply two thin coats with a foam roller or wide brush. Let each coat dry fully. For chalk paint, drying is quick (30 minutes to 1 hour).
This base coat is your canvas. Make sure it’s smooth and even before moving to the design work.
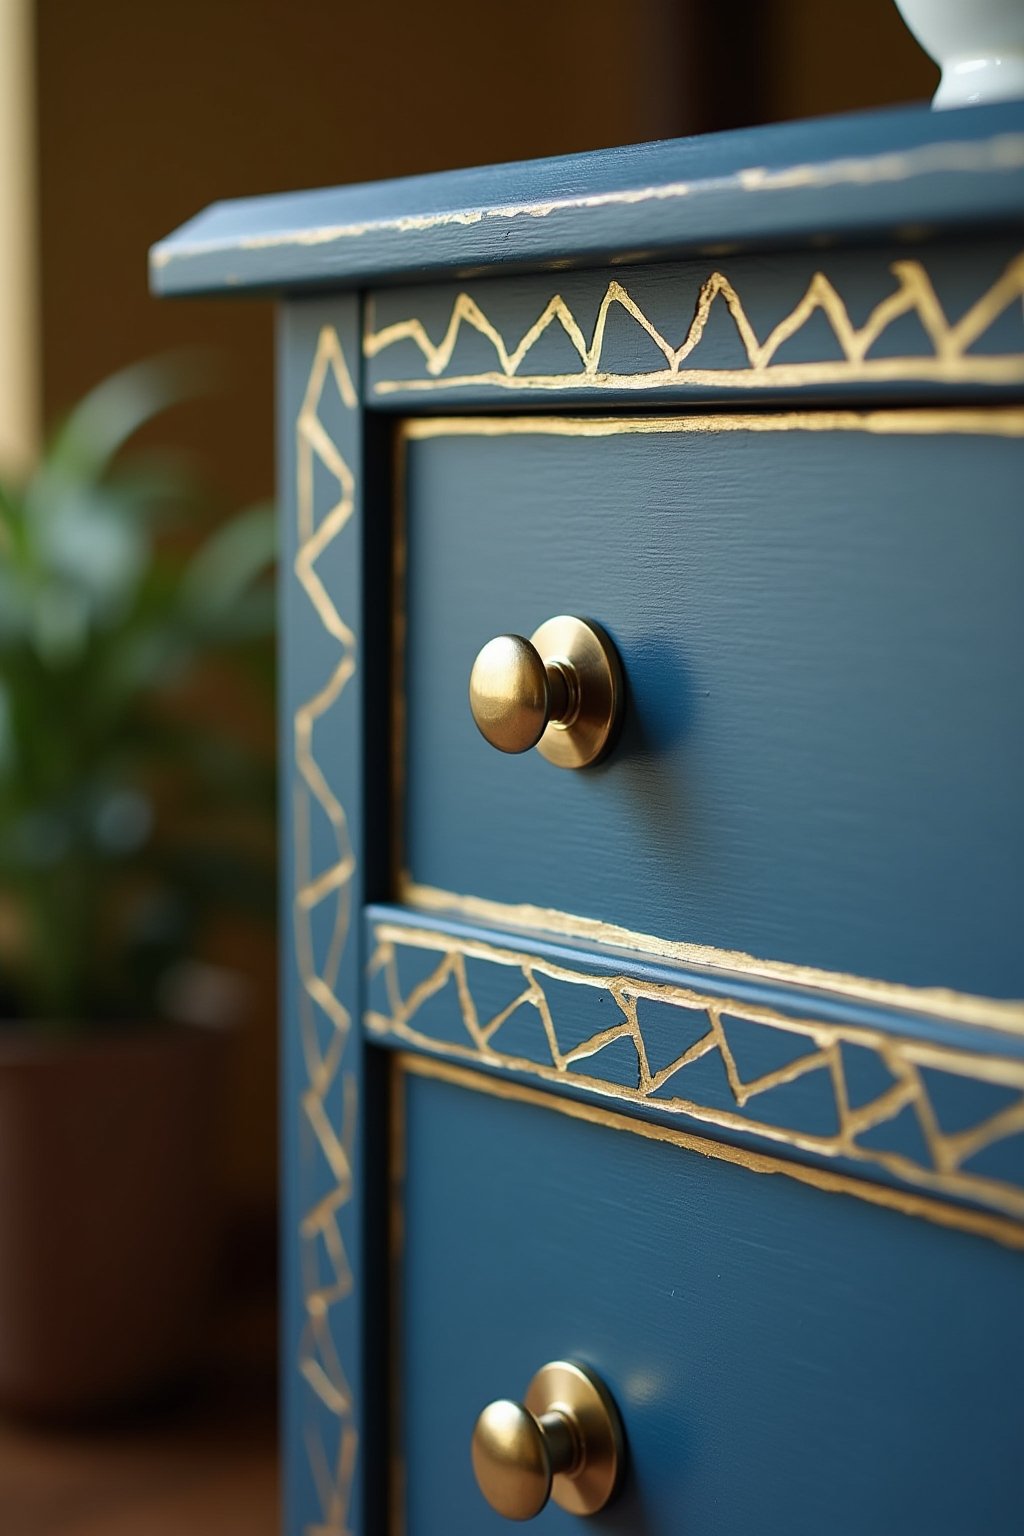
Create Your Pattern or Design
For geometric patterns, use painter’s tape to mask sections, then paint with your second color. For stenciled designs, secure the stencil firmly and use a dry-brush technique (minimal paint on the brush, dab rather than stroke). For freehand, sketch lightly with pencil first.
Work in small sections and step back frequently to check your progress. Patience is everything here.
Seal and Protect
Once your design is completely dry, apply a clear protective topcoat. Polyurethane in satin finish is the most durable. For a vintage look, use clear furniture wax. Apply thin coats and let each cure fully.
Two coats of protective finish ensures your hand-painted design lasts for years of daily use.
Common Mistakes to Avoid
- Starting too ambitious — begin with a small nightstand or chair before tackling a large dresser with intricate designs
- Using too much paint on the brush — the number one stencil mistake. Dab excess paint on a paper towel before touching the stencil
- Skipping the topcoat — unprotected paint chips and wears quickly. The clear coat is non-negotiable for functional furniture
- Not testing colors together first — paint swatches on a piece of cardboard and hold them against the piece before committing
- Painting over hardware without removing it — always remove pulls, knobs, and hinges before painting for a clean, professional result
Budget Tips
Hand-painted furniture is inherently budget-friendly:
- Source furniture for free or cheap on Marketplace, Craigslist, or curb alerts
- Craft store chalk paint is $10-15 per quart — enough for a dresser
- Stencils are reusable and cost $8-15 from craft stores
- Dollar store foam brushes work fine for base coats
- Leftover paint from other projects works perfectly for detail work
- A $30 find + $20 in supplies = a $500+ looking custom piece
Styling Tips
- Let the painted piece be the focal point — keep surrounding decor simple so your custom furniture shines
- Pick up one paint color in your room decor — a throw pillow or rug that matches your design color ties the room together
- Consider the room’s existing palette — your painted piece should complement, not clash with, the space
- Style the top surface simply — one lamp, one small plant, and one decorative item is plenty on a painted dresser
- Use hardware as jewelry — new brass or ceramic knobs elevate a painted piece from DIY to designer
- Group painted pieces sparingly — one hand-painted piece per room is a statement; three is a craft fair
Room-by-Room Inspiration
Bedroom
A hand-painted dresser in deep blue with gold geometric lines becomes the centerpiece. Keep the rest of the room neutral to let the dresser stand out.
Entryway
A small painted console table in bold color welcomes guests and sets the tone for your home. Add a mirror above and a plant on top.
Living Room
A painted side table or bookshelf adds personality to a neutral living room. Botanical stencils on a sage green base feel fresh and modern.
Frequently Asked Questions
Do I need to sand furniture before painting?
Yes, light sanding with 150-grit creates tooth for paint to grip. For laminate furniture, use a liquid deglosser or bonding primer instead of heavy sanding.
What type of paint is best for furniture?
Chalk paint (Annie Sloan, Fusion, or craft store brands) is popular for its matte finish and ease of use. For high-traffic pieces, furniture-specific latex paint with a polyurethane topcoat provides the most durable result.
How do I paint a pattern without stencils?
Use painter’s tape for geometric designs — stripes, chevrons, color blocks, and diamonds are all achievable with just tape. For organic shapes, sketch lightly with pencil first, then fill in with paint.
Can I paint IKEA furniture?
Yes, IKEA furniture can be painted if properly prepared. Clean with TSP, apply bonding primer (essential for laminate surfaces), then paint with your chosen color. Sand lightly between coats for best adhesion.
How long does hand-painted furniture last?
With proper preparation (cleaning, sanding, priming) and a durable topcoat (polyurethane), hand-painted furniture can last 10+ years with normal use. High-traffic surfaces like table tops may need touch-ups sooner.
What’s the easiest pattern for a beginner?
Color blocking using painter’s tape is the easiest and most forgiving. Tape off geometric sections and paint each a different color. The clean lines of tape make even beginners look skilled.