I remember the first time I saw a color-drenched room in person. It was at a friend’s apartment in Brooklyn — she had painted her entire bedroom, ceiling included, in a deep sage green. The effect was immediate and almost magical. The room felt like a cocoon, wrapping you in warmth the second you stepped inside.
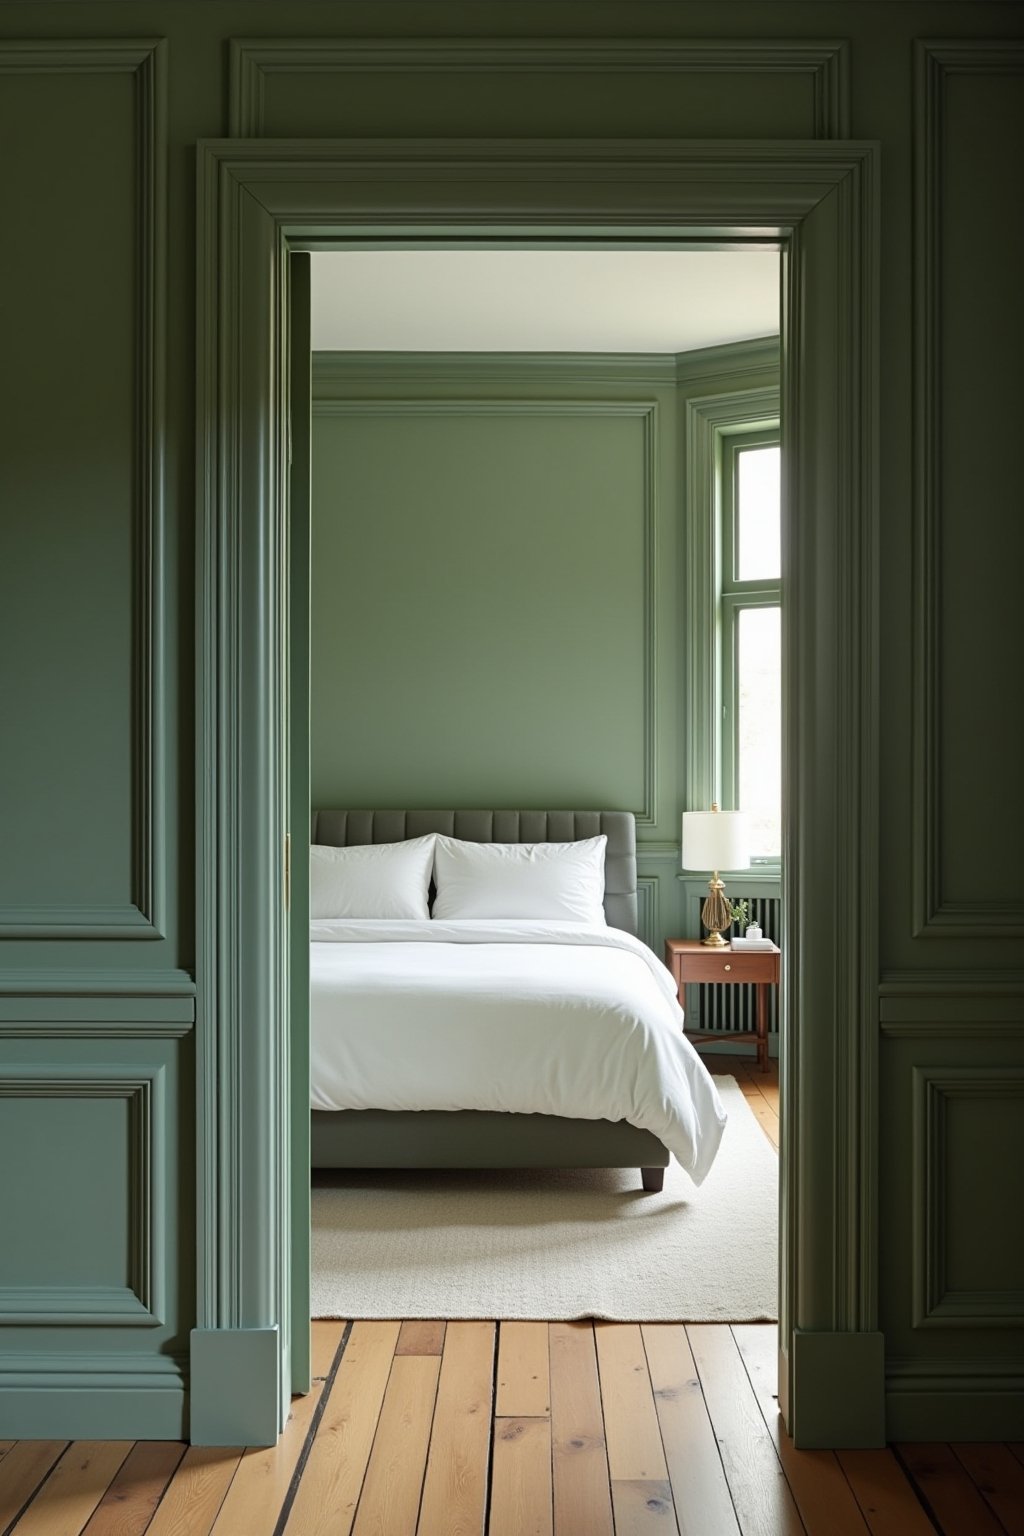
Color drenching is exactly what it sounds like: painting everything in a room the same color — walls, ceiling, trim, even doors. It’s one of the boldest interior design moves you can make, and it’s absolutely dominating Pinterest right now. If you’ve been wanting to transform your bedroom into something that actually feels intentional and designed, this is the guide for you.
Why This Works
- Creates instant visual impact — a single bold color unifies the entire space and makes even small rooms feel purposeful
- Eliminates awkward color transitions — no more wondering if your ceiling white matches your wall color
- Makes rooms feel larger — when everything is one color, the eye can’t find edges, so the space feels expansive
- Works in any size bedroom — from tiny apartments to master suites, the technique scales beautifully
- Surprisingly forgiving for DIYers — since everything is one color, small imperfections blend in naturally
What You’ll Need
Here’s what you’ll need to pull off a professional-looking color drench:
- Paint — enough for walls, ceiling, and trim (calculate square footage carefully — you’ll need more than you think)
- Primer — especially important for ceilings and if you’re going dark over light
- Angled brush — for cutting in around fixtures and corners
- Roller and extension pole — essential for ceilings without a ladder
- Painter’s tape — for light switches, outlets, and window glass
- Drop cloths — protect your floors and furniture
- Paint samples — test at least 3-4 shades before committing
Step-by-Step Guide
Choose Your Color Wisely
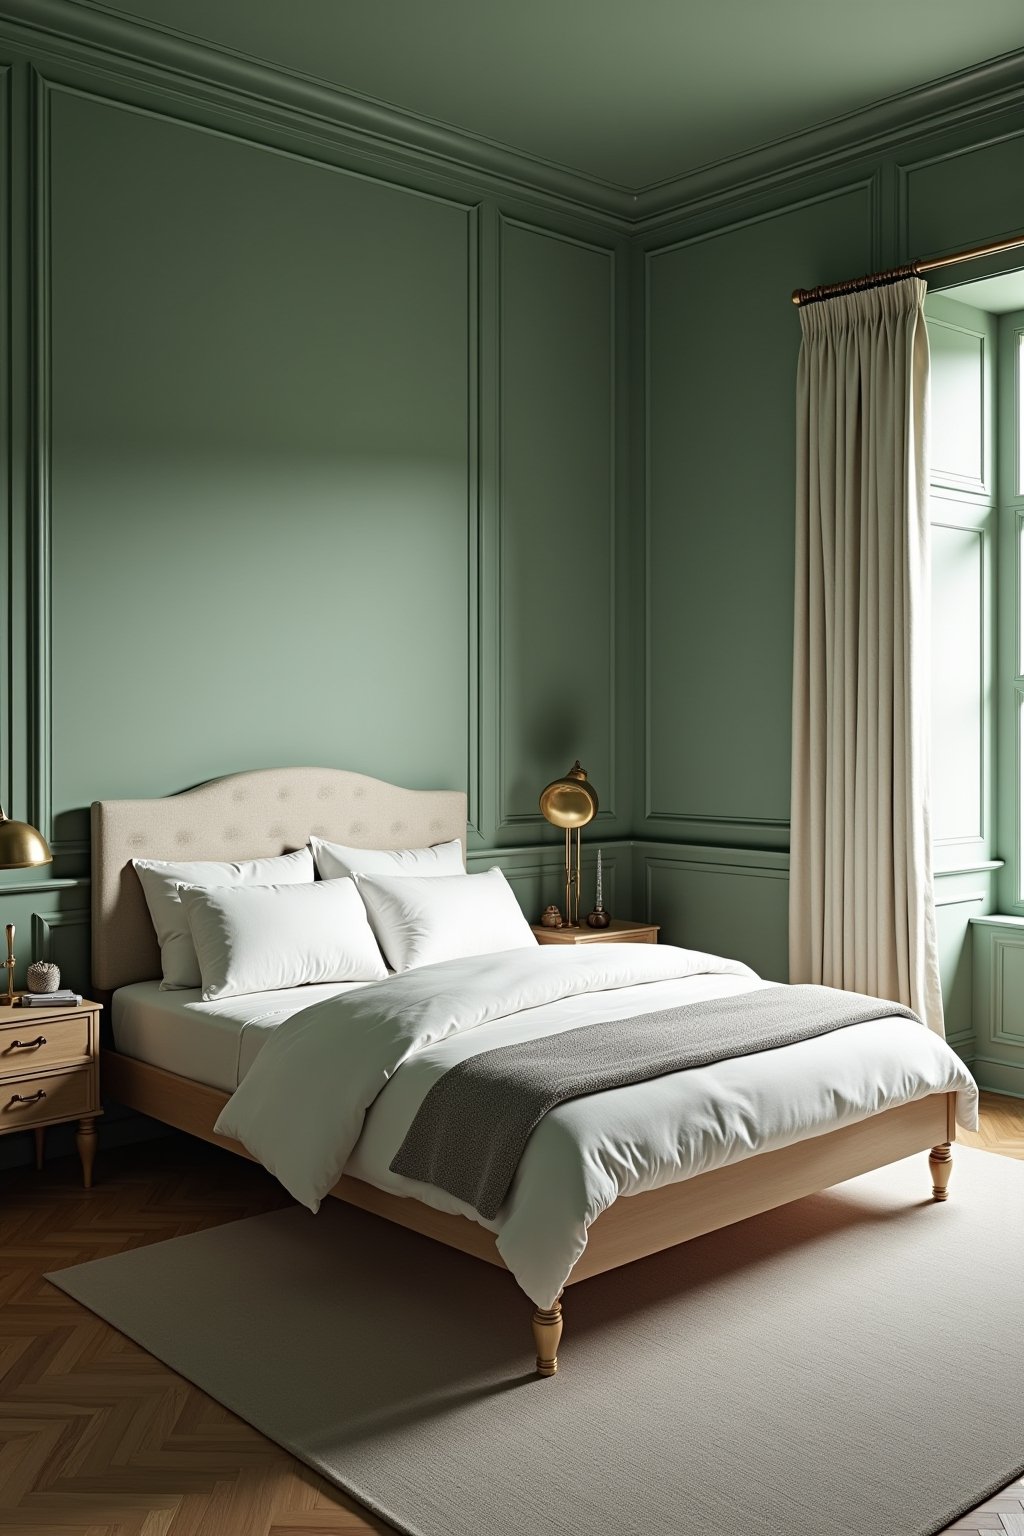
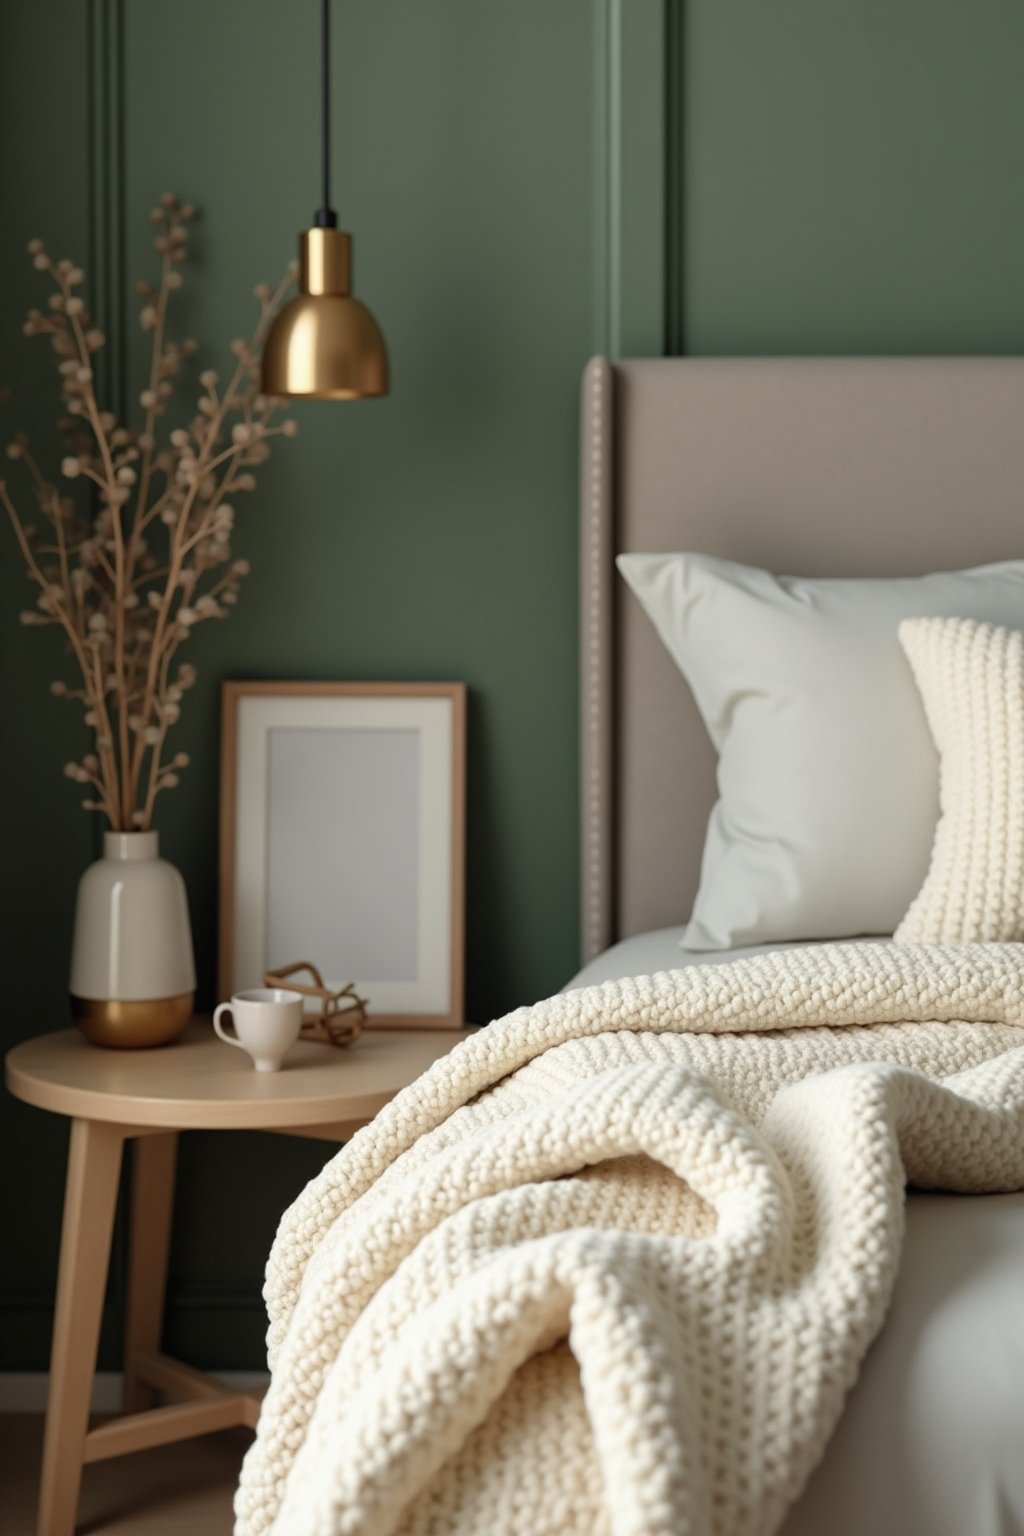
The most popular color drenching shades right now are deep sage green, warm terracotta, moody blue, aubergine, and creamy off-whites. The key is choosing a color with enough depth to create that cocoon effect without feeling oppressive.
Test your color at different times of day. Paint a large swatch (at least 2 feet square) on both a wall and a piece of poster board you can hold up to the ceiling. Colors look dramatically different overhead than at eye level.
Prepare the Room Properly
Remove all furniture from the center of the room. Take down curtains, light fixtures, and outlet covers. Fill any nail holes or cracks with spackle and sand smooth. Clean walls and ceiling with a damp cloth to remove dust.
Prime everything — especially the ceiling if it’s never been painted a color before. Ceiling primer prevents drips and ensures even coverage.
Start with the Ceiling
Always paint the ceiling first. Use a roller with an extension pole and work in sections, maintaining a wet edge to avoid lap marks. Apply two coats, letting each dry completely (usually 4 hours between coats).
Cut in around light fixtures with an angled brush before rolling. This is the most physically demanding part — take breaks.
Paint the Walls
After the ceiling is fully dry, move to the walls. Cut in corners, around windows, and along the ceiling line. Then roll each wall in large W-shaped strokes for even coverage.
Two coats minimum. Dark colors may need three coats for full, even coverage without streaks.
Finish with Trim and Doors
This is what separates a color drench from just painting a room. Paint all trim, baseboards, crown molding, window frames, and the door in the same color. Use the same sheen for everything (satin or eggshell works best for a cohesive look).
For trim, use a high-quality angled brush for a smooth finish. Consider using the same paint in a semi-gloss on trim for subtle dimension while keeping the same color.
Common Mistakes to Avoid
- Choosing too dark a color in a north-facing room — north-facing rooms get cool, indirect light that can make dark colors feel cave-like. Warm undertones help compensate
- Skipping primer on the ceiling — this causes uneven coverage and visible drip marks that are nearly impossible to fix
- Using flat paint on trim — trim needs at least satin sheen for durability and a professional look
- Not testing the color on the ceiling — colors look 50% darker overhead because of shadow and angle
- Rushing between coats — letting each coat dry fully prevents peeling, bubbling, and uneven finish
Budget Tips
Color drenching is actually one of the most budget-friendly room transformations. Here’s how to keep costs down:
- Buy paint during holiday sales (Memorial Day, Labor Day, Black Friday) for 30-40% off
- Use one paint and finish throughout — buying just one color saves money over multiple products
- Borrow an extension pole and ladder instead of buying
- Skip the painter’s tape on ceiling-to-wall transitions since they’re the same color anyway
- A single gallon covers about 350-400 square feet — calculate carefully to avoid over-buying
Styling Tips
- Add contrast with textiles — white bedding, cream curtains, or natural linen pillows prevent the room from feeling flat
- Use metallic accents — brass lamps, gold frames, or copper plant pots catch light and add dimension
- Layer different textures — velvet pillows, woven baskets, and knit throws add visual interest without adding color
- Install warm-toned lighting — 2700K bulbs enhance the cozy feel of a color-drenched room
- Keep furniture neutral — let the walls be the star by choosing wood tones and neutral upholstery
- Add one statement piece in a complementary color — a single terracotta vase in a green room or a mustard throw on a blue bed
Room-by-Room Inspiration
Small Bedroom (Under 120 sq ft)
Color drenching actually works best in small bedrooms. The uniform color erases visual boundaries, making the space feel larger. Choose a warm medium tone like dusty rose or sage. Keep furniture minimal — a bed, one nightstand, and a wall-mounted shelf.
Master Bedroom
Go bold. Deep navy, aubergine, or forest green create a luxurious retreat. In a larger room, you have space for contrasting furniture pieces. A light wood bed frame against deep green walls creates stunning contrast.
Guest Bedroom
Warm, inviting colors like terracotta or warm gray make guests feel welcome. Add plush white bedding and a reading lamp for a boutique hotel vibe.
Frequently Asked Questions
Does color drenching make a room look smaller?
Actually, the opposite. When walls, ceiling, and trim are all one color, the eye can’t find the edges of the room, which makes the space feel larger and more expansive. This technique is especially effective in small bedrooms.
What paint finish should I use for color drenching?
Use eggshell or satin for everything including walls, ceiling, and trim. Some designers use the same color in semi-gloss on trim for subtle dimension while maintaining the monochromatic look.
How much paint do I need to color drench a bedroom?
For an average 12×14 foot bedroom with 8-foot ceilings, you’ll need approximately 3-4 gallons for two coats on walls, ceiling, and trim. Buy an extra quart for touch-ups.
What are the best colors for bedroom color drenching?
The most popular and effective colors are deep sage green, warm terracotta, moody navy blue, aubergine (deep purple), dusty rose, and warm off-whites. Choose colors with warm undertones for a cozy bedroom feel.
Can I color drench a rental bedroom?
Yes, but choose a color that’s easy to paint over when you move out. Lighter shades like warm gray or dusty rose require fewer coats to cover back to white compared to deep navy or black.
Should I paint the closet doors the same color?
For the full color-drenching effect, yes. Paint closet doors, the entry door, and all trim the same color. This creates the seamless, immersive feel that makes the technique so striking.